Wednesday, June 21, 2017

Little Witchy Chaise

Lately I have been in a mood for Hallowe'en and most of my art has been centered around the holiday, so when I got a sweet 1:12 scale miniature chaise lounge from Alpha Stamps I knew just how to decorate it. 


The miniature Wrought Iron Table looked nice along side the chaise, especially after it was given a furry edged table cover. The accessories like the Large Amber Onion Jar of roses, a pewter candlestick, a set of keys, and a few other things helped too.


The chaise is a cinch to assemble and decorate as it comes, but it is equally simple to upholster it, making it soft and squishy like a chaise should be. 


Materials you need to upholster the chaise:

Miniature Chaise
Fabric
Quilter's 80/20 Quilt Batting or any other thin cotton batting
PolyFil stuffing
Embroidery Floss
Glue

The first thing you do is trace around the seat, back, and side pieces onto lightweight cardboard. I did this twice for two reasons. 1. In case I screwed up. 2. I wasn't sure if I also wanted to lightly upholster additional pieces to add on the outside of the chaise, covering the entire thing in fabric. Can never be too prepared. Trace inside the tabs of the chaise pieces then connect the lines with a straight edge. Now trace 1/8" inside those lines and cut out the pieces. 


Trace around the cardboard pattern pieces onto cotton quilt batting and cut out. Also trace the cardboard pattern pieces on the wrong side of your fabric, adding an ample 1/4" around all the edges so you have plenty of fabric to wrap around the batting sandwich and glue to the back. Place a wad of polyfil stuffing on top of pattern piece and trim around the edges. Glue the cotton quilt batting pieces to the cardboard pieces and place polyfil stuffing on top. 


Turn your batting sandwich over and place it in the center of your fabric piece, then glue the edges to the cardboard. 


Paint your chaise then glue in the upholstered pieces. I found it best to add the seat first, then the back, followed by both sides.


To cover slight gap between the cushion and the chaise, glue matching embroidery floss along the edge,then  add the legs, and you're done! 


I crocheted a round pillow using yarn from the Noxious Fumes fiber set and also added a bolster pillow with the same fabric used for the table cover. 


For a complete list of supplies used, GO HERE.

It is never too early for Hallowe'en crafting, right? Go get your spook on!

Wednesday, June 14, 2017

Mermaid Paper Dolls

I have been enjoying Alpha Stamps' Articulated Mermaid Paper Dolls lately, especially when I am feeling creative but am too busy for any quality crafting time. The first doll is Ariel during her Goth stage. She was such a rebel in her youth!


Very unlike her sister, of course.


The placement of the arms can change the appearance of the dolls. Ariel's arms are almost guarding whereas her sister's seem to be open and loving.


I've another hour before we head to the beach. Maybe there's time for one last mermaid doll...

Supplies Used:

Articulated Mermaid Paper Doll
Saucy Witches Collage Sheet
Victorian Bats Collage Sheet
Mermaid Garden #1 Collage Sheet
Articulated Mermaid Paper Doll Set
Midnight Masquerade 8x8 Paper Pad
Heavy Double-Sided Crepe Paper Fuchsia-Maroon Red
Small Rose Buds- Pink Red Purple


Friday, June 9, 2017

Cabinet Card Hand Bound Book

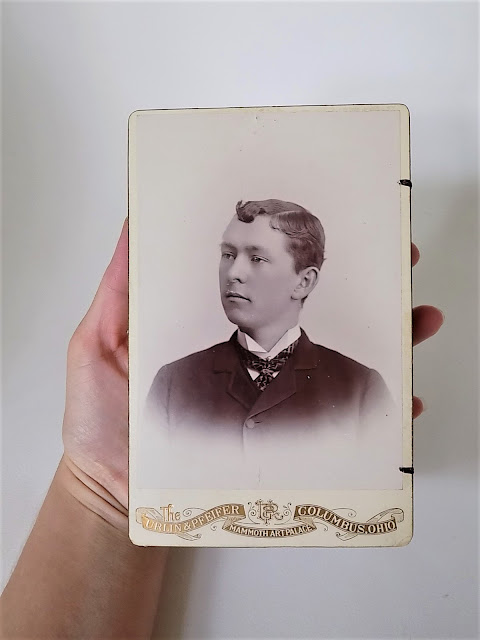
When I am in want of vintage ephemera, cabinet cards, or postcards, I am fortunate enough to have a local antique shop that satisfies all of my needs. On a recent visit, I happened upon two stately gentlemen on cabinet cards and purchased them without a project in mind. They proved purposeful a few weeks later as covers for a hand bound book. 


Book binding is a completely new experience for me. It is a fascinating art, and a difficult one. Hand cutting forty-four same-sized sheets of pages AND rounding eighty-eight corners ain't no joke! I did not have proper waxed linen thread for binding the book together so I separated the threads of an unknown mega strong thread I had in the stash (37 million yards of it. It took eons and tangled like Rapunzel's hair, but I told myself using stash was better than spending $2 on proper thread. eye roll).  Did I mention having to wax this 37 million yards of thread? 


The back is just as handsome, but the mustachioed gentleman won out for the front cover.


The book was made for a self-proclaimed geek so I typed a few of her favorite quotes on a couple of signatures. 


There are five or six quotes in the book but the rest are blank pages for her own use. Making a book like this was completely new to me but it was satisfying to see I could mostly do it. I might even make another. After spending the $2 on linen thread, of course.

Saturday, June 3, 2017

For Want of Legs Mermaid Book

Alpha Stamps' design team got to play with articulated mermaid dolls this month, which I love! I've made many a doll with moving parts, but having chipboard pieces and pre-made holes for brads makes a big difference. Decorating them is as simple as cutting out parts of images you like, gluing them on, and adding the brads. Having a chipboard base means the arms and tail move more easily, too. 

My initial plan was completely scrapped and the idea of a little book telling the story of a mermaid wishing for legs emerged. The idea actually came from Leslie asking, "maybe make up a story of a mermaid becoming human?", but her story might have been a little less...risque? But maybe not! I decided to balance out the naughty side of the book by adding a nice side, where maybe a girl is dreaming of being a mermaid. So, it is a two sided book. Both covers are sturdy chipboard Etched Mini Book Covers, with the nice side of my book showcasing the beautiful ship. More on that in a bit. Let's peek at the naughty side first.


The mermaid doll can be removed from the cover. 


Inside is the story of the mermaid desperately wanting a pair of legs and all of the things she could do with them. It is more of a poem and less of a story, actually, so it makes more sense knowing that from the get-go. 


Ok then! Let's talk about the book's pages for a second. They were made with bleach, stamps, and black cardstock! I used a bleach soaked paper towel as a stamp pad and stamped the entire sheet of cardstock. A few colors of ink were rubbed on the pages as well as a spritz of Lindy's Stamp Gang Starburst Spray in the Mermaid Set. That's the naughty side. The opposite side is a lot less exciting.

This is a quickie in-progress picture to show how the book is two-sided. One story is bound in the fold behind the ship cover and the second is bound in the other.


The nice side is simplistic, with no text, and filled with beautiful mermaids.


I cut out images of mermaids and glued them onto the pages I made using the Life in Color Discovery paper. Then I cut around the images a second time, so when the pages are together you can see each mermaid.


Completely different than the other side, isn't it? The construction is easy; it is exactly like a regular book with an extra flap. You need the Etched Mini Book Covers, a piece of cardstock measuring 4"W x 8 11/16" L, ribbon, and your book pages. Make two folds that are 2 14/16" from each edge of the cardstock. This is the middle part of the book. The book pages should measure 3 3/4"W x 5 1/2" L. Make a signature by stacking the pages together then folding them in half. Here are my finished pages for each side of the book, the cover with the ship, the middle accordion folded cardstock, and the other cover.


Glue ribbon on back of one cover.


Glue cardstock on top. The fold will align with the right edge of the cover.


Glue other cover face up on last flap of cardstock.


Align the pages inside the book, with the folds together, and poke spaced holes along the fold. Sew the pages in using thread or embroidery floss. It helps to cradle your book inside an opened phone book and use an awl for making the holes, but I don't have either of those things. A tapestry needle worked quite well. And there you have two stories in one! 


Happy crafting!

You can see all of the supplies I used RIGHT HERE.