Wednesday, September 25, 2019

Little Witch's Wall Shelf

I have been going through all of my miniatures from Alpha Stamps and turning them into spooky little things. The latest miniature being this very sweet White (!) Wooden Wall Shelf, which can also work well for Christmas- no painting needed! Hmmm, Christmas. Might need to get another shelf...

This one was painted black with a coat of regular old black acrylic paint, then a coat of crackle medium (PVA glue works too), and finally a coat of brown paint. I glued tiny drawer pulls along the bottom of the shelf. After that, the shelf was stuffed with bottles, skulls, jars, and a frog!


Pretty much everything used on the shelf was given a wash of watered down acrylic paint and antiquing fluid to give it a nice grungy look. 


The candle holder is a Gold & Bronze Earring Back glued to a metal bit and the candle is made from Stockmar Modeling Beeswax with a snippet of sewing thread for the wick. And oh whoa look at those impossibly small skulls on the bottles (an upside down Tiny Black Acrylic Coffin, seed bead, and plastic skull). There is an incredible amount of detail for their size. How big, you ask?


Holy Halloween, Batman! That's small! (I love it.) The Mini Mason Jar - Large worked out well for a water slide decal from the Tiny Halloween Icon Decals. There's a short tutorial down below.


If you squint really close you might can make out a crystal ball between the mason jar of powdered death and the bubbling green potion bottle. I pressed some polymer clay into the crystal ball on the Witchy Props Mold, baked it, then chopped off the ball part. The base was painted silver and a 12mm Glass Cabochon was glued to the base. I had filled the ball portion of the mold with resin and mixed in some glitter, but I got too impatient waiting for the resin to cure and used the cab instead. 

You can find a list of all the supplies I used for this little witch shelf HERE.

Now, on to the water slide decals! These brought me back to when I built model cars as a kid. 

First, cut out the decal and remove the protective covering:


Soak decal in water for 20 to 30 seconds:


Slide decal to the edge of the paper:


Place edge of decal on surface:


Slide paper off the decal and poof! Instant Hallowe'en dishes for your minis.


Only 36 more days left; better get back to crafting!

Here is the SUPPLY LIST again in case you missed it. 


Wednesday, September 18, 2019

A Creepy Crib and Carriage

Today's project was a collaboration between Leslie and I; we were talking about Hallowe'en, of course, miniatures, and babies?? I can't quite remember exactly how babies became part of the conversation (demon spawn may have been mentioned...) but next thing I knew, there was a package from Alpha Stamps in my mailbox. Inside was a plastic bag with some parts and the words "crib?" on the outside. Hmmm, well okay!

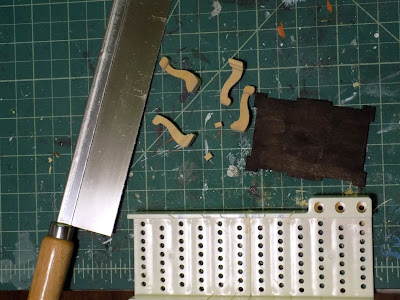
Inside the bag was a Bagatelle Box - 2x3 Inches, a few Miniature Gothic Fences, and four Short Cabriole Legs. That was the perfect start to a very creepy crib! I added a Miniature Reliquary as a headboard and a few claws...


Morticia Addams would be pleased. 

The construction was incredibly easy. I used the back of the Bagatelle box for the bottom of the crib and cut one Gothic Fence to fit the foot end of the crib. The other two fence pieces fit without trimming. Everything was painted black and the fence sections were glued to the Bagatelle back. The Miniature Reliquary headboard also was painted black. I stamped a skull from the Poison Rubber Stamp Set onto a piece of cardstock, colored in the background, and glued an eyeball to the top. The eye was cut from the Eyeballs collage sheet, glued to a metal bit I had laying around, and then a glass cabochon was adhered to the top. All of that was then glued to the crib.


The mattress was made exactly like the Witchy Chaise Lounge from a few years ago. I cut a piece of cardboard 1/8" smaller than the Bagatelle back/crib base:


Cut a piece of felt and wool batting (polyfil fiber works too) the same size as the base, and finally a piece of fabric that is approximately 1/2" wider than each side of the base. Layer the pieces, wrap the fabric around the layers, and glue the fabric to the back of the base. Glue the newly made mattress to the base of the crib.


To make the legs a little more stable, I chose to trim off the top portion of the cabriole legs. They were painted black and glued in place. The claws on the legs are tiny, tiny polymer clay bits. I made 20 or so of them because they're so small and I knew I'd drop a few while attempting to glue them to the leg.


The last thing added to the crib was a fun mobile made from wire, bent filigree, three rubber bats, and a pewter spider charm. I just painted everything black that wasn't already black, glued the wire to the spider (which is stuck on the headboard), glued the filigree to the wire, and tied the bats to the filigree. Like most craft projects, there was lots and lots of gluing. 


To make your own creepy crib, go HERE to see the supply list!

In addition to parts to construct a crib, Leslie also sent along a fun, very tiny, baby carriage and a Mini White Baby Doll Figurine! 


How tiny is it? Think of this as a doll pram for your dollhouse doll. That size. Two of them fit inside the above crib!

After covering the carriage in black acrylic, wispy cobwebs were painted on the canopy of the carriage.  I added a black sitting cat inside (because where a cat fits, it sits) and Halloween Gargoyle faces to the wheels.


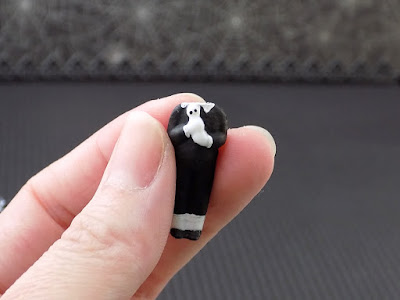
The figurine got me thinking of Wednesday Addams and her little dollies, so I pretty much immediately sawed off the head of the figurine after painting it. 

And then glued it to the carriage.


HERE's where you can see the short list of supplies for the baby carriage.

Hope you're having as much fun with your Hallowe'en crafting as I am!

Thanks for helping create this ghoulish project, Leslie!


Sunday, September 15, 2019

Happy Halloween Tiny Shrine

Can it be?? Is Hallowe'en really just six weeks away?! Nooooooooooo!!! I still have a giant pile of spooky things to make!

This latest Hallowe'en project was a quickie craft mostly because I have been too busy all week to do anything creative. How sad. So today I told all of my smallish people to pretend I was invisible. Someone decided Boo Berry was a suitable lunch.

I had been sent a sweet Small Simple Shrine from Alpha Stamps and right away knew I had to use the Articulated Skeleton (ahem, his name is Hubert) for this project. He fit so perfectly!


I basically just covered the entire shrine with paper from the Happy Halloween 6x6 Paper Pad and painted the inside. There's a Creepy Tree in there, and a Tiny Tombstone, Hubert, of course, as well as a snippet of Gothic fence! Hubert is holding a Halloween flag made from a toothpick and some text from the Retro Halloween Cards and Tags collage sheet. And since I live in a spooky southern city, I had to add creepy moss to the tree. Fall foliage was used to cover the bottom. This shrine is about 1/2" deep and held all of that with room to spare. Pretty impressive!


Here is the back minus the small picture hook that belongs on the back. The shrine is so small (2 1/2" wide x 4" tall) that it will fit nearly anywhere. Hubert is going in the bathroom once I get to the hardware store to pick up the hook. Since the smallish people (at least one of them) ate monster cereal for lunch, I suppose I will wait until tomorrow to get the hook and instead cook something decent for dinner.


Guess what? I managed a super fast second project after dinner! I was cleaning up after the speed craft episode earlier and made three treat bags. Using the super cute Retro Halloween Party Invitations collage sheet, Happy Halloween paper, and All Hallow's Eve paper that was strewn about the craft table, I managed to create three simple treat bags for a party. 


I made paper medallions from black or orange crepe paper, layered a circle of mesh fabric on top of that, followed by a circle of scrapbook paper, and finally an image from the collage sheet. Pretty basic. Kinda cute.


I'd like to say I'm going to clean up the disaster that is now my craft table, but with only six weeks 'til Hallowe'en that seems pointless. Might as well leave all of this stuff out and craft all the things!

You can go HERE to see the supplies I used.

Happy Hallowe'en crafting to you!