Eeek, Halloween crafting is in full swing! My entire craft area is covered in bats, skulls, spooky paper, black cats, glitter...I think all of the Halloween stuff I own is scattered across two tables (save for a teensy workspace where the cat sometimes sits).
I finished a mini project recently using Alpha Stamps new Little Niche Shrine - Coffin. Leslie knows how much I love the niche shrines, so she sent one to play around with. (it is also possible I begged for one, whatever!)
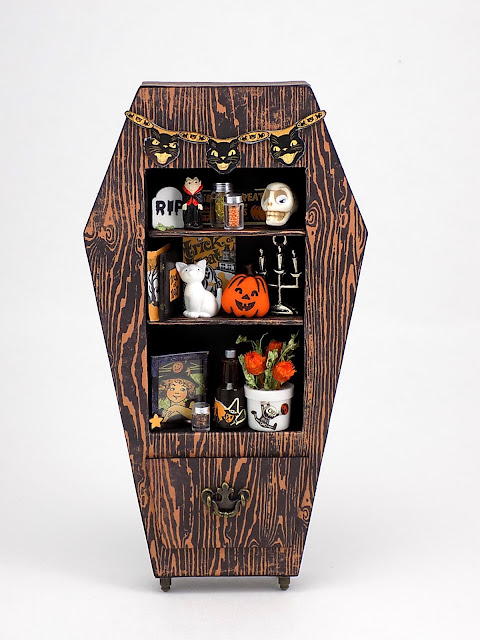
I covered the sides of the shrine and added two shelves to make a miniature hutch to use in a future project. There's a faux drawer and spindly feet, too. A brief run-down for adding sides and shelves is down below.
There are a few Mason Jars filled with glitter and microbeads, a candelabra, jack-o-lantern, a tombstone...
It doesn't take much to transform your Little Niche Shrine into a piece of furniture - a few shelves, some feet, and giving it sides is all you need to do.
First, paint your shrine pieces black.
Cover the front and back pieces with paper. I chose to cut out a small rectangle in the center of the shrine front and wrap the extra paper around to finish the edges.
Cut small segments of basswood or balsa and glue them along the top, bottom, and side edges of the back piece. Glue the niche in place on the front piece.
Apply glue to the edges of the shrine and wrap a strip of paper around the shrine. This works best if you have 12 x 12 paper because one strip will wrap around the shrine. I used two strips from a sheet of 6 x 6 and made the strips meet on a corner.
The shelves are nothing more than strips of cardboard that is wrapped in paper and glued in place:
Cut two pieces of cardboard 1 3/4" x 1/2" (pssst, it's the free stuff that is shipped with collage sheets from Alpha Stamps).
Paint the edges black and glue one strip to your paper.
Apply glue to the other side, then fold the strip upward. Cut off the excess paper. Poof! One shelf covered!
Repeat for the other shelf and glue 'em where you want 'em. Done!
So now that my coffin hutch is finished, I'm going to dig through the scattered stash for the things needed for the next Halloween project while enjoying a bowl of Count Chocula. It is Halloween, you know.
Happy spooky crafting!


ANOTHER gem! YOU are sooooooo clever. This would be perfect for my Halloween birthday cousin. I've gotten things for her over the years. Will share this idea. Lynetta
ReplyDelete