Aren't they sweet? The laser cut houses range in size from 3.5" to 4.5" tall and are around 2" to 2 1/4" wide, making them a nice size for a quick and simple gift to someone special.
I chose to paint the shadowboxes with a slate grey paint first, then apply a crackle glaze, and then add a white topcoat. The interiors of the houses were papered with the beautiful Provincial 12 x 12 Collection, and then the entire thing got a good scrubbing of antiquing fluid.
For the inside of the houses, I embroidered birds and NEST on some scrap muslin that was then hung from backyard twigs and glued in place. Houses are people nests, so that is how I settled on the wording for House 2. Acorn caps make the perfect feet, but only after you sand the tops even so your houses don't topple over! (Lotsa glue helps, too.)
An acorn cap also worked out as a fine house number plaque, with a bit of paint and glitter, a snippet of lace, and one of these really nice vintage mini numbers.
Finding a nest small enough to fit inside the house was difficult, so why not make one myself? If you ever find the need for a miniature nest, here is a very uncomplicated way to assemble one.
Gather your materials!
Tacky Glue
Miniature Hay Bale
Styrofoam ball in circumference to your needs
Antiquing Fluid or brown acrylic paint
Plastic Wrap
Masking tape or rubber band
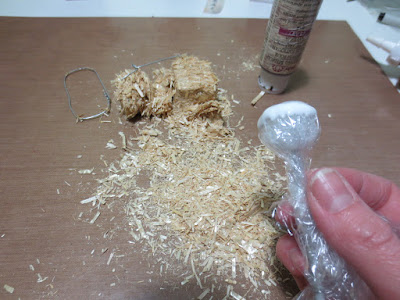
Okay! First, stick your styrofoam ball on the end of a skewer/knitting needle/ chopstick/wand then wrap the ball in plastic wrap. I have also annihilated my mini hay bale.
Next, use masking tape to hold plastic wrap in place, then slather a thick coat of tacky glue to top of styrofoam ball in a bird nest shape.
Press ball into hay shavings, ensuring you have a good thickness of hay.
 |
| Hee. Looks like the beginnings of a funny doll. |
I had to quit amusing myself with the nest-on-a-stick and shoved it in a good spot to dry. And dry, and dry.
24 hours later, you can paint your nest with brown acrylic paint, antiquing fluid, or just leave it as is. Then trim away excess plastic wrap and remove ball. Carefully, carefully peel plastic wrap from the nest, paint the inside, and POOF! There is your nest.
Happy crafting!
Supply list for The Birds Shadowboxes can be found HERE.
Found the camera, so here's the last shadowbox house that got turned into something completely different:
It seems I have had Hagrid's hut on the mind lately.
Look! It's a hatching Norbert! That was as good as it was going to get because the paperclay egg I made is about the same size as a pea. The table is made from balsa wood and the candles are modeling beeswax.
The rest of it came from Alpha Stamps, and here's a quick list.
Mini House Shadowbox
Provincial 12x12 Paper Collection
Pumpkin Pod
Windows 4 Panel Rectangular
Sheet Moss
Lakes and Clearings Collage Sheet
Leafy Green Underbrush
Moonlit Spiderweb Network Scrapbook Paper
Creative Paperclay
Mica Tiles there is a sheet of this between the window frame and the collage sheet. It makes great panes!


