In actuality, this should be titled "C is for Chaircat Mao" since that is the cat which inspired the project. I was sent a 4" Mini Folio and the oh-so-covetable Graphic45 Raining Cats and Dogs Deluxe Collector's Edition paper from Alpha Stamps and set to work making a little album of said cat.
Look how cute the folio is! It is pretty versatile and would look great with 3D elements, ribbons, charms, and whatnot on the outside. Lots of possibilities for this! I covered mine in black cardstock first, then added paper from the G45 line as well as a chipboard piece for the front. There is a magnet on the flap and another on the cover to keep it closed.
The inside is also pretty simple and plain, but the fun part is the mini album. The folio kit includes two album pieces of pre-scored black cardstock, so that translates into six book pages and a front and back cover! (Psst, the folio includes a belly band that is easily added to the inside in case you want to add tags, journaling cards, or additional pictures!) It helps that Alpha Stamps has pages of cat-related items.
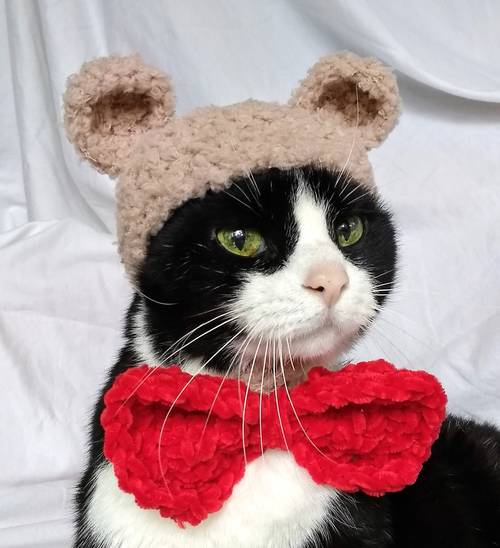
Awww, there's my kitty! She is wearing one of the many hats I crochet for her, which she mostly tolerates, but occasionally she gives me side-eye and would rather just sleep. I used the pictures of her acting like a normal cat for the album because they were kind of funny with the sarcastic text stickers I used.
Oh, that IS a whatever face! Chaircat Mao (Chair, for short) was looking incredibly unamused in her poppy hat.
"Nope. Not caring about you or for this umbrella on my head. Seriously?"
The last two pages are relatable to all cat owners, I believe. Chair must've liked her little blossoms hat...haha! Not all kitties are keen on wearing hats so there are always the Little Crowns or Little Hats Chipboard Sets.

This little folio is easy enough finish in a day. I started by covering the folds of the folio with linen tape and painted it black. The outside of the folio was covered with black cardstock after that. I laid it over two sheets of cardstock, traced around the edges, and cut out the cover (leaving an ample amount to fold over to the inside. This also meant that I didn't have to cover the inside, too, because the decorative paper was cut large enough to cover the unfinished parts of the folio). I scored the folded edges and notched the paper on the corners to eliminate the bulk. To finish it, I simply cut the Raining Cats and Dogs paper to cover the folio. Now up to this point in my life I had never owned a paper trimmer and got by with a straightedge and a scalpel. But I bought one right before starting this project and OH WOW! I had all of the bits cut out in no time at all! It was a fun project to do, and it would make a nice gift with a pretty little book inside, maybe of Spring flowers, or Halloween! Oooh...Halloween...
Finally, here are few pictures of Chair in her hats, mostly to show you that she isn't normally peeved at wearing them.
Happy crafting!
Supply list can be found HERE.
Sometimes I pick up a crochet hook and make stuff. Usually that "stuff" means hats for our ever patient cat, Chair. She has quite the collection, actually.
But one can only crochet so many cat hats and also expect only so much tolerance from the cat. I settled on a really cool skull shawl on Ravelry called the KOPF-TUCH by molli woodtagger. It was a well-written pattern that is easy to follow. I worked on it off and on in the evenings and had it finished in about 10 days.
This one has gone to its new home and maybe after a few more cat hats I will be wanting to make a second.
After five years of being a Floridian, my daughter packed up to attend grad school in another state. She left behind scores of friends, colleagues, a few family members, and loads of memories. So, when presented with a Double Explosion Box from Alpha Stamps, I didn't have to think twice about how it was to be decorated. It was fortunate for me to also have gotten two collage sheets of vintage Florida postcards and souvenirs...it couldn't have been more timely! I covered the exterior of the box with a few choice images and on the top went a miniature white beach chair, Cocktail Umbrella, and an over-sized Cosmo. It's hot in Florida. You gotta stay hydrated, people.

To make the topper for the box, I first traced the around the bottom of the chair onto a wooden disk, slathered glue over the disk (avoiding the traced area), then dumped a profane amount of glitter atop the glue. It wasn't purposeful, just one of those inevitable crafty mishaps that always end with either a hot glue blister or being covered in glitter. The chair, umbrella, and shells were glued in place and I added a baker's twine edging. Technically, I added the twine first but I'm too lazy to go back and edit the instructions.
The box itself is 3" x 3"- an excellent size for a small gift- and the "exploding" interior offers eight surfaces to embellish. I used these areas for photos of my daughter and her friends, and found the mini box portion of the Framed Matchbox Book to be cute picture frames.
To keep with the overall theme, I figured a souvenir snow globe was a must because nothing says memories like a cute figurine in a dome of water! Mine isn't quite as complicated though. I glued a Micro Mini Flamingo to the base of a Miniature Glass Snow Globe, added a wee Bushy Plant, and once dry, dumped a bit of glass microbeads in the globe before attaching the base with Glossy Accents glue. The snow globe is stuck on the wooden disk with a glue dot and can be removed easily.
And finally, a little tip if you want to cover the bendy parts of chipboard or cardboard. Use linen book tape. It is flexible, paintable, and durable. Sometimes, however, you find yourself out of linen tape and have to make do with Duck Brand Fabric Tape (which works nearly as well, btw).
I'm off to mail this exploding box in hopes of it being a nice surprise to my daughter. I'm also sending along a photo of our cat which she will most assuredly love!
Supply List for can be found HERE. Keep on making!
I had a moment to myself the other day and put together some witchy ATCs. They were a fast project since all I really did was paint the frames and back pieces of three Wrought Iron ATC Cards then spritz them with Lindy's Stamp Gang Sprays. The Blushing Ladies collage sheet and a few eensy weensy 1.5 mm Gold Stars finished them off.
While watching Hocus Pocus, I crocheted a new hat for Chaircat Mao.
She got a pirate hat in September:
And my smallish people made a cake. It was delicious!
I am still crocheting holiday hats for Chaircat Mao, and here are the latest ones:
Mohawk
Failed sunshine hat
Pigtails
and a Viking Helmet
She must think her left side is her good side.
For the past couple of months, I have been been assembling a miniature craft room inside an 8" x 6" x 5" deep room box. It is a pretty small space but there are so many things going on inside. It started with a Treadle Sewing Machine on Table, then a Sewing Room Thread Cabinet, along with a Library Table that worked out great as a place to store bolts of fabric, and finally half of a Chipboard Steamer Trunk for a bookcase, all from Alpha Stamps.
Would you like to have a look around?
The sewing machine, like all of the pieces in here, got a thorough sanding and aging to make it resemble a well-loved room. I added a rectangle of heavy weight cardboard to the Library Table on the right, and the Thread Cabinet on the left appears to be the cat's favorite thing to scratch. After getting all the furniture painted an arranged, the fun began! Just how much stuff can fit in here? The answer is loads and loads; enough that my smallish people made a game of I-Spy from the things inside.
I Spy a teacup,
Orange slices, and a duck.
You might find two rabbits
If you have extra luck.
I Spy four golden scissors,
Specs without a case,
And a single smiling cookie
That seems out of place.
I Spy a phone number,
A shell from the beach,
A small home for a gnome,
And a jar out of reach.
(thanks for the great rhyme, AJ!)
I built the corkboard from balsa wood and cardboard, but adding shutters from the Seaside Doors and Windows Set gave me more places to hold items and ephemera. The stick pins are super tiny Mixed Size Flat Back Pearls!
Did you see the spools of thread? They are made from a snippet of toothpick between two hole-punched disks of watercolor paper with thin ribbon glued around. Easy!
The hoop in the basket is another quick thing; cut a thin strip of watercolor paper, wrap it around a pencil, and glue the ends. When dry, sand the join until it is smooth, then paint. Glue a tiny eyeglasses screw (the kind you get in the eyeglass repair kits) to the top. To make the "embroidery", doodle an image onto printer paper and wrap it around a button that fits inside your hoop. Glue in place.The needle is a tiny piece of wire with a bend in one end.
I left the top unglued to make it easier to get around in there, especially since none of the pieces are attached or adhered in any way and I inevitably knock something (usually lots of somethings) over. The lamp hadn't gotten its shade when the pic was taken.
Here is the adorable Thread Cabinet that really opens:
And with a ruler for scale:
There is an excellent tutorial on Casey's Minis for a miniature sewing box, which is what that is on the right. The cigar box is a 1" Faux Book Box and it holds tiny spools of thread. The last thing I made for the Quilter's Nook was a floor lamp, in case the wee crafter wanted to get some sewing done at night. The tutorial for that was posted yesterday.
Finally comes the link to the oodles and oodles of supplies I used from Alpha Stamps. Happy crafting to you!