Saturday, August 27, 2022

Sit A Spell Mini Room Box

 I'm in love with the Charmed 8x8 Paper Pad from Alpha Stamps! Not only are there several really cute patterns, but also most can be used for 1:12 projects. I used a few sheets in a 7x7 Corner Room Box along with a 1:12 Corner Cabinet, Shallow 3D Fireplace, a Tall 4-Panel Art Nouveau Screen, and a Chaise Lounge Kit that I made many moons ago. It finally has a proper place to live in a cozy sitting room.


I started by painting all of the furniture and the edges of the room box black, then assembled the pieces before adding the paper. The walls and borders are from the Charmed 8x8 Paper Pad and the floor is covered with Crescent Moon Scrapbook Paper. I used 3 panels of the Tall 4-Panel Art Nouveau Screen, decorated it with the Charmed 8x8 Paper Pad, a tiny resin skull, and then hinged it together. The Shallow 3D Fireplace is super easy because all of the detail work is already done on the Victorian Fireplace Collage Sheet. Just cut out the parts and glue in place. The mantel is a rectangle of basswood painted black. Easy peasy. The tutorial for assembling and upholstering the chaise lounge can be found HERE


One of my favorite parts is the 1:12 Corner Cabinet, probably because there's room to stuff loads of minis on the shelves. After painting the cabinet black, I lightly sanded parts of the front, added a painted Wide Brass Filigree Header, and another one of the black Tiny Resin Skulls to the top. The inside of the cabinet was lined with Charmed paper before being filled with all the spooky stuff. There are books, a 1 Inch Detailed Resin Skull, lots of bottles, a 1:12 Resin Brandy Bottle, a 1:12 Brass Picture Frame painted black, a few cats, and a Mini Gargoyle right in the center. 


Above the fireplace is a Gold Victorian Mirror (painted black) that's been adorned with a 12mm Round Glass Cabochon and an eyeball from the Eyeballs Collage Sheet. I like to sneak an eyeball or two in Halloween projects. Lots of them come from this collage sheet. I didn't do anything to the plant other than paint the pot to match the chaise lounge. It's pretty cute, too. 


There was enough room left over for a carpet and a dainty Candlestick Table (also a miniature cat or two if you have them!) 


Thanks for taking a peek at my little Halloween sitting room -  don't forget to hop over HERE to see all the goodies used! 

Happy creating!

Saturday, July 23, 2022

Wickedly Delicious Recipes Folio

Hooray for Halloween crafting (and Alpha Stamps for being my one-stop shop for all the treats!)
I've been in a mood to make something with the Pocket Folio from the Retro Baking Junk Journal Kit and couldn't resist filling it with ghastly recipes and a fridge card fit for any goblin!


The front cover was painted and covered with several papers before a bunch of raffia was glued on, followed by super cute Mini Witchy Shapes and Small Chipboard Apothecary Jars. I think there's a few eyeballs in there, too...


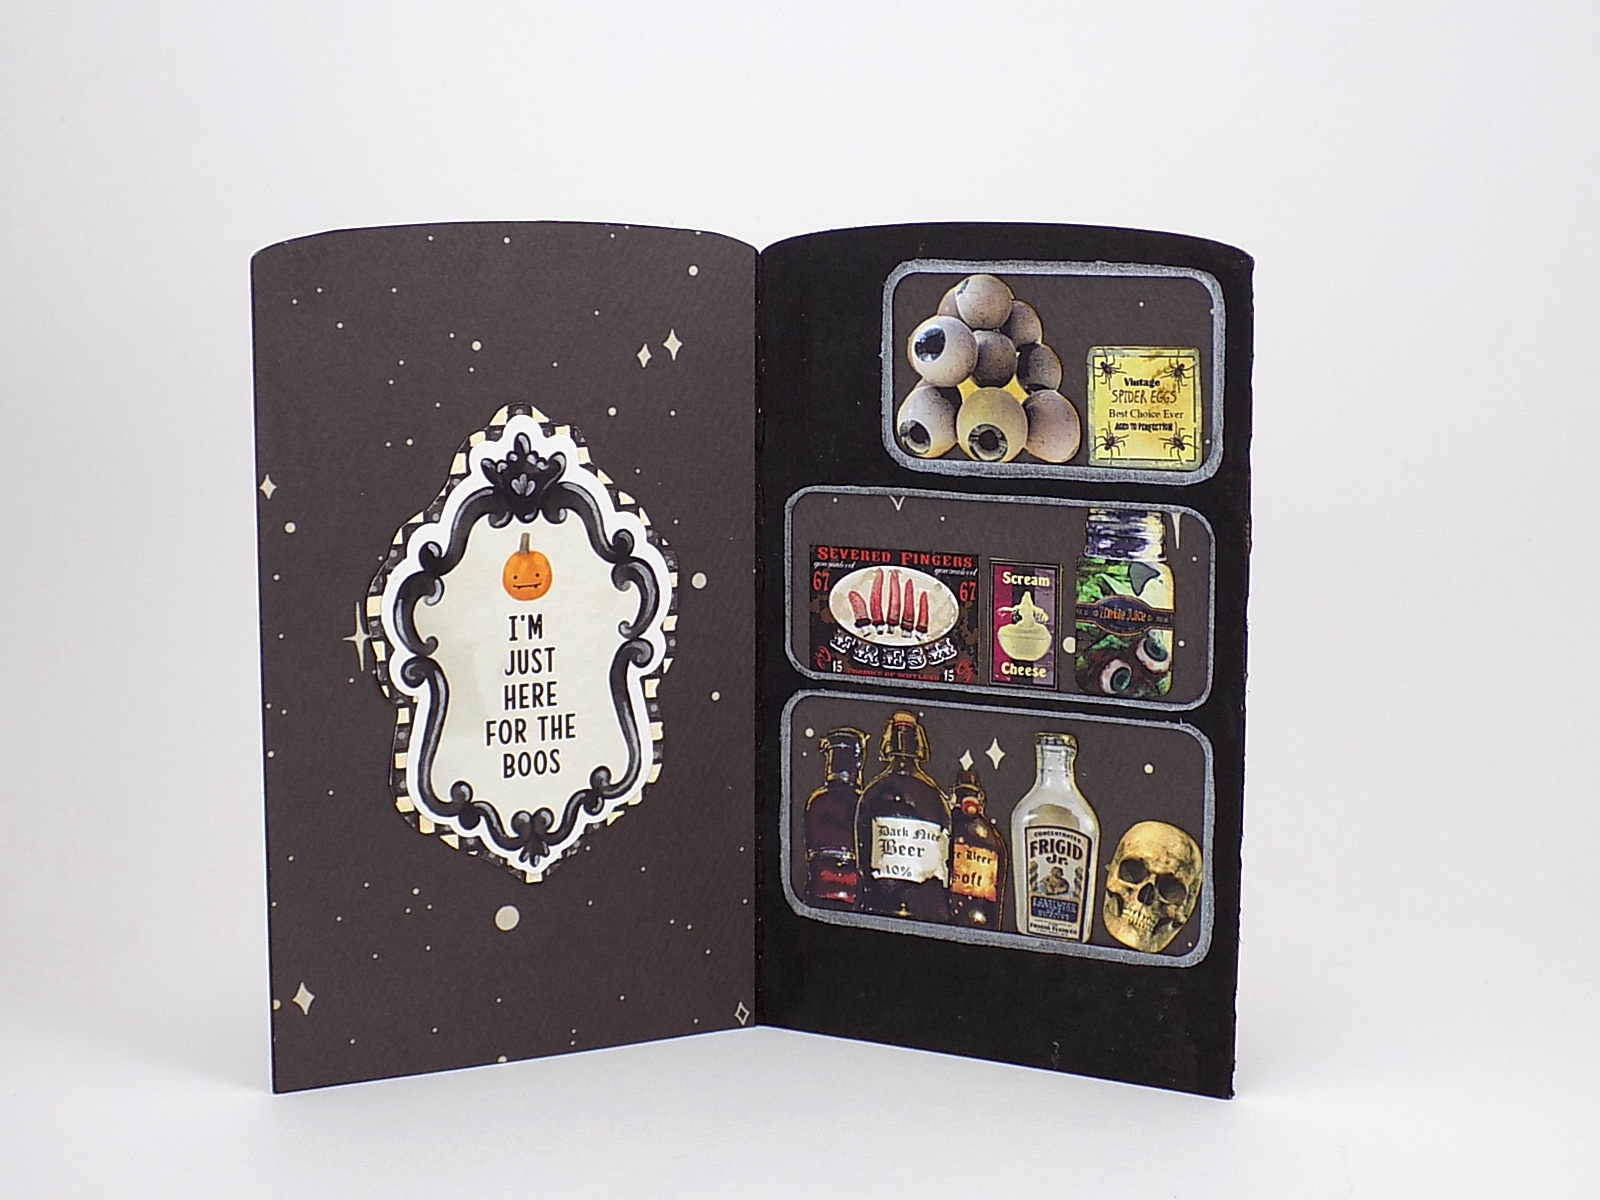
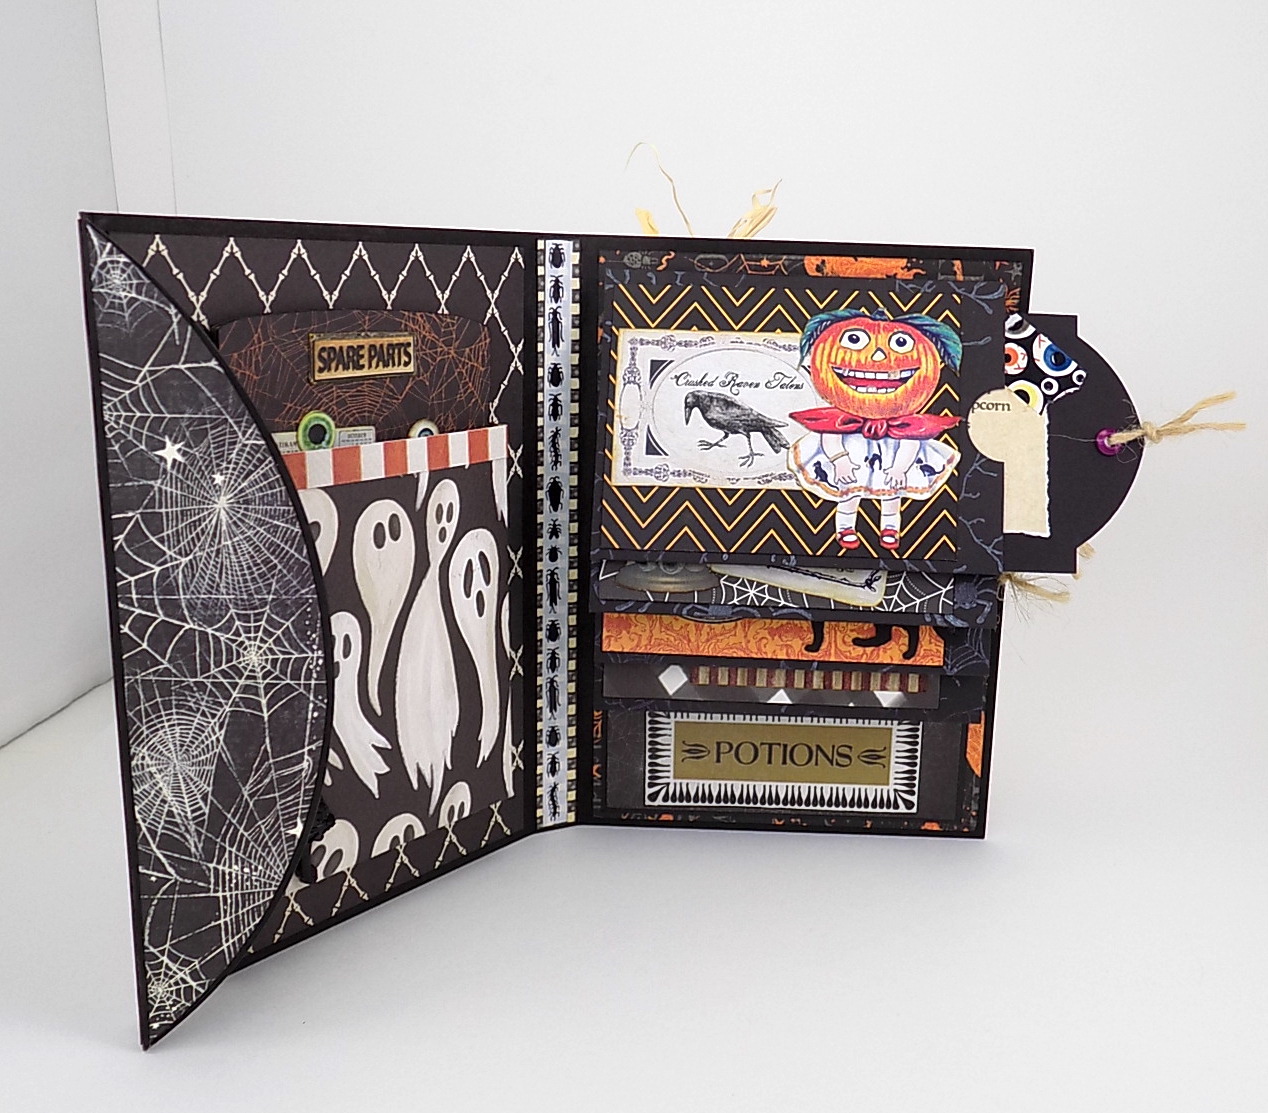
The inside has a pocket on the left with a fun surprise inside, and on the right side are waterfall pockets that hold those wicked recipes. 


Oh my, what kind of refrigerator is this?? I've never heard of the Spare Parts brand, but the bone door handle is interesting. Do the eyeball magnets come with it? Ha, ha!


There's a slew of delicacies inside the fridge, like spider leg ice cream, fresh severed fingers, and zombie juice. The freezer section could use a little door - don't want those (i)ce cubes melting!


Inside the waterfall pockets are recipes for dishes like Crushed Raven Talons and Graveyard Moss - so tasty!


One side of each tombstone card has the ingredients and the other has the instructions on how to prepare a few frightful treats. Mmm, Death Head Moth Wing Fungus! Who's ready for a bite?


Here's a little tutorial on the waterfall pocket assembly for your folio. There is probably an easier way to make it, however, this is how my brain works, so here ya go:

1. Cut a strip measuring 12" x 3 3/4" from 12x12 black cardstock. Score at 2 3/4", 5 1/2", 6", 8 3/4", and 11 1/2".

2. Turn over the strip and add thin double-sided tape to the top and along both sides of the bottom.

3. Remove all the tape from the side with tape at the top and bottom, and fold together, lining up the top edges. I did go back and add a bit of tape to close one side of the pocket, so maybe you ought to do that during this step. :) I taped the left side of all the pockets closed and left the right side open to hold the tombstone recipe cards. 

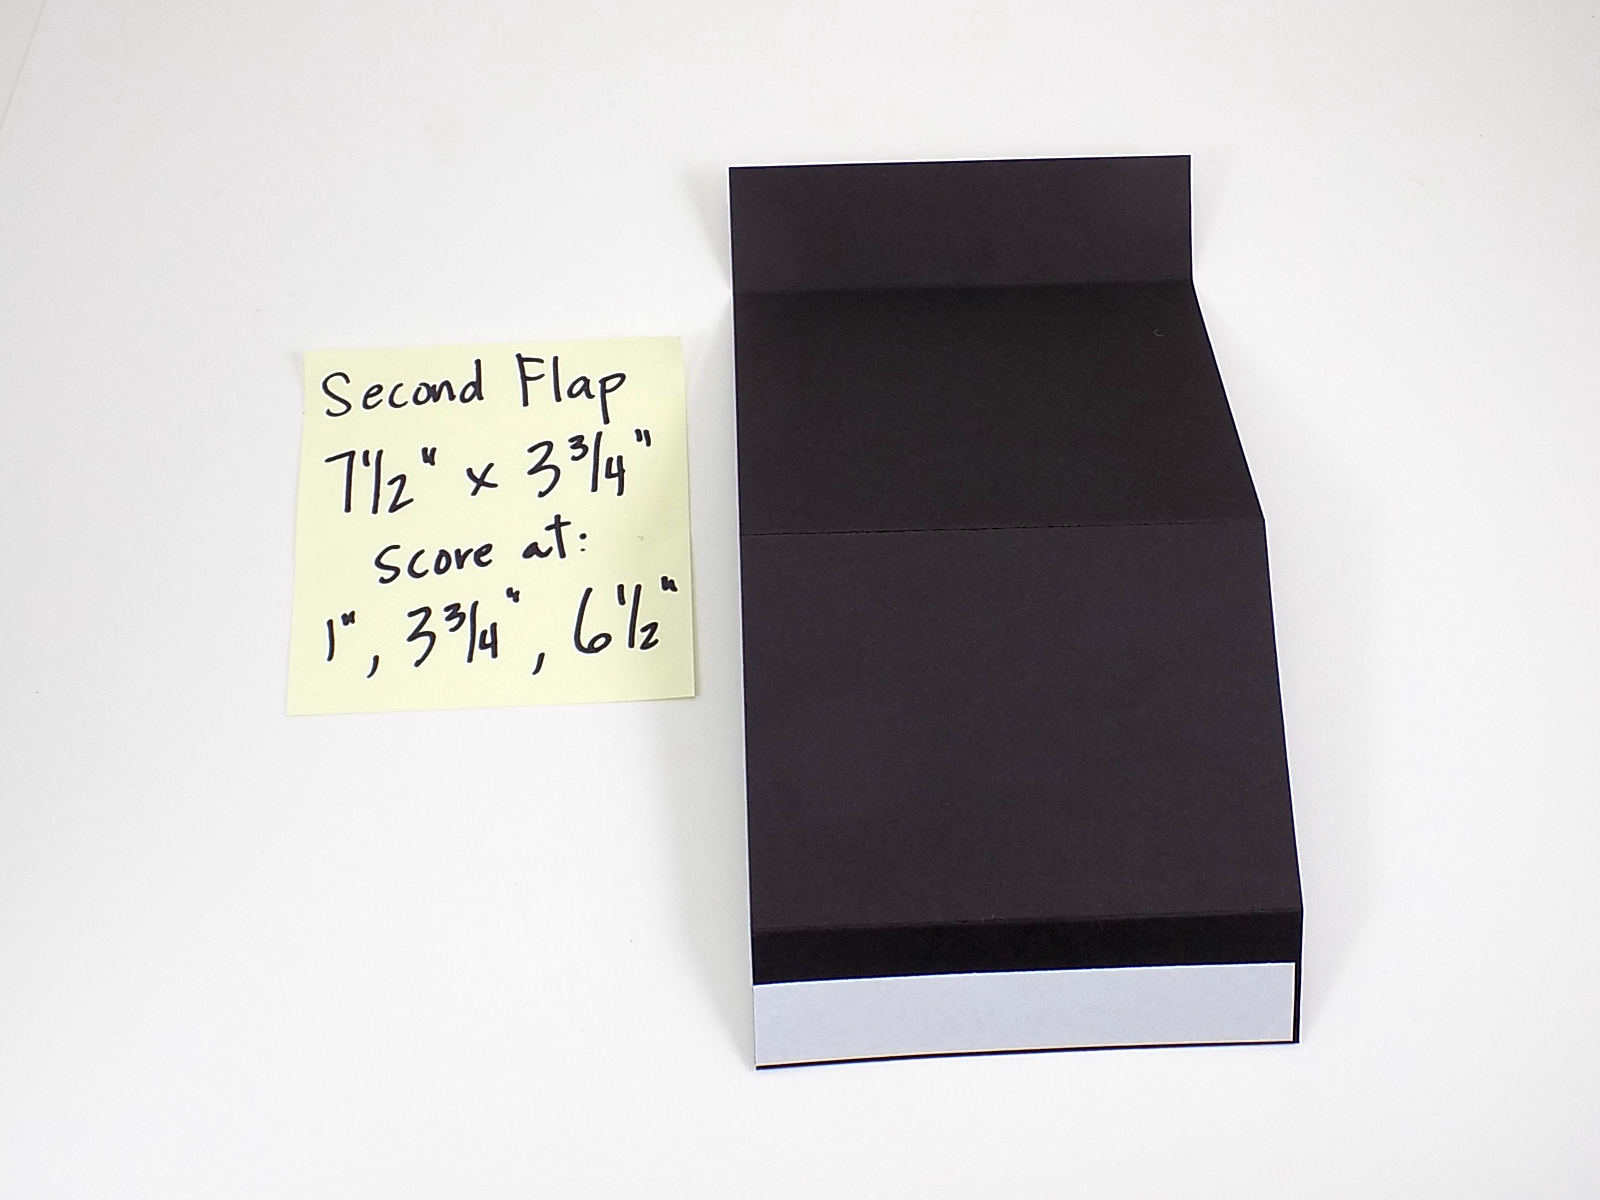
4. Cut a strip of black cardstock measuring 7 1/2" x 3 3/4". Score at 1", 3 3/4", and 6 1/2" like so:

5. Add double-sided tape to both sides of the bottom flap, fold the pocket, remove the tape backing on that flap only, and tape together.

6. Cut a 12" x 3 3/4" strip from 12x12 black cardstock. Score at 1 1/2", 4 1/4", 7", and 7 1/2".

7.  Add double-sided tape to both sides of the 1/2" section. Remove the tape backing from the front and press down. Fold the pocket, remove other tape backing, and tape to top of flap, lining up the top edge with the taped edge.

Here are all of the assembled flaps/pockets!

8. Remove tape from the back of Second Flap and place on top of Third Flap, matching the top edges. Remove tape from the back of the First Flaps and fold the pocket up so its top edge matches the top edge of the Second Flap. Press in place.  

Finished waterfall flaps with pockets:


Thanks for taking a peek at my spooky folio with dreadful recipes (actually, they're all pretty good!) Happy creating!

GO HERE to see all the goodies!


Wednesday, June 29, 2022

Half Scale Farm House Book Nook

 I fell in love with the Mini Book Nook kit from Alpha Stamps when it arrived - it's so tiny! At 4-1/2" tall, it is the perfect size for a half scale scene. I had planned on using the bookstore-themed paper and collage sheets that are in the kit (equally tiny and adorable), but chickens seemed the way to go. 


See? Chickens! The Farmlife Custom 12x12 Paper Set was used for the outside of the book nook and the small prints in the Sunflower Market 6x6 Paper Pad became excellent wallpaper (and there are chickens). On the right of the book nook is an Even Tinier Crate full of hay and vegetables, a Half Scale White Chair, and the shorter Half Scale Cafe Table (it comes in a set of 2). I also made a framed picture from part of the Sunflower Market 6x6 Paper Pad.


There is a Half Scale Door on the left along with a doormat, rooster, and potted tree made from a Rustic Broom and clump foliage.


Along the back wall is a 1:24 China Cabinet (with an added curvy bottom) and tons of itty bitty bits inside, like Half Scale Bowls, a Tiny Pink Perfume Bottle w Tall Neck, and a White Yogurt Drink Bottle. My favorite pieces are the nesting hen and the rooster on the floor. And maybe the minute flower pot on the table, too...


Here is an idea of the size of the Mini Book Nook (amongst some books that have nothing to do with farm life, but that's okay):


Plus a few more photos with the top removed. More on that in a sec.


It is pouring down rain again today, so please forgive the dark photos!


And now more about the top of the book nook and the purpose of the little square box. I decided to cover the 6v Warm White Fairy Lights battery pack (which rests on top of the book nook) with a lid from a 2x2 Sturdy Kraft-Wrapped Box. The battery pack fits snuggly inside and won't fall out when you need to turn the lights off and on. 


The lid was covered with paper from the Farmlife Custom 12x12 Paper Set and the fairy lights were threaded through the slot in the back of the book nook. I glued the Lattice Ceiling Insert in place but not the top of the book nook so I can get to the lights inside. The rest of the wire and the battery pack fit inside the box lid that rests on the top of the book nook. 


It feels great to be working on art again after such a long hiatus. I think I need another Mini Book Nook kit to make the teensy bookstore.

You can GO RIGHT HERE to see all of the goodies used in the Half Scale Farm Life Book Nook. 

Happy creating to you!


Wednesday, April 6, 2022

The Unexpected Guest

Life has been a bit crazy lately, but I managed a little art project for Alpha Stamps using the pretty Woodland Window Box Kit for April. I've been ready to make art for awhile now but found the days ending before my To Do list was completed. This kit made it possible to squeeze in some creativity which is exactly what I had been missing for so many weeks! 


I really love the new facade with an inset niche - it adds extra space around the opening of the Even Smaller Paper Theatre Box for decorating and the Window with Flower Box is icing on the cake! The finished project is small enough that, when not mounted to a platform base like my example, can be hung on a wall or displayed on an easel. How cute would that be?


I decided to glue a bunch of bushy plants and mushrooms to mine, so went with the 5x2 Platform Base. An arch of twigs were also glued to the base and, as a bonus, I got to use more of the scrummy Woodland 6x6 Paper Pad. It's beautiful paper. 


The back is fairly simple with more greenery. The window from the Decorative Windows Set 1:12 holds a surprise:


Ooooh, a light!


The Even Smaller Paper Theatre Boxes are 3/4" deep, so the wireless Single LED Light I used worked out nicely. It gave the lanterns on the collage image a warm light to shine on Snow White. 

Here's a simple walk-thru if you want to add a light to your Woodland Window Box Kit:

1. Fold your Even Smaller Paper Theatre Box together. Trace around the window from the Decorative Windows Set 1:12. I used the curved window only and not the frame. 

2. Cut inside the traced line along the bottom and around the curved top, approx. 1/16". Use a bone folder to score the box on the traced line on the uncut side for the hinge. Make a tiny cut from the curved cut to the scored line. Having that extra bit will allow the window to open properly.


3. Either fold your own, or cut a matchbox in sections like so, then glue them together so it is a solid box with no top. This will hold the Single LED Light.


4. Glue the Facade on the Even Smaller Paper Theatre Box, making sure the wider section of the facade is on the bottom. You can see the tabs of the facade just touch the cut marks for the window and the top tab is folded inward. I snipped off the point of that tab before gluing it in place. If you plan on papering your kit, remember to trace the Facade and the niche opening before gluing.


5. Cut a strip of paper to cover the inside edges of the niche. My strip is 7/8" wide x 12" long. Use double sided tape or glue.

6. To support the collage image inside the niche, add adhesive dots or foam to the corners. Glue in the box that holds the LED light. The foam dots should be the same height or a little taller.

Here is the inside of the niche showing the top of the LED box. I added a strip of cardboard in the center to keep the LED upright with its bulb extending beyond the box. The light shines through the cardstock collage image, illuminating the lanterns. I love it when things work out so perfectly.


Add your collage image to the foam dots then decorate! Yay!


Want to see all the fab goodies I used? Go right HERE!

Happy creating!