Showing posts with label shrine. Show all posts

Wednesday, April 6, 2022

The Unexpected Guest

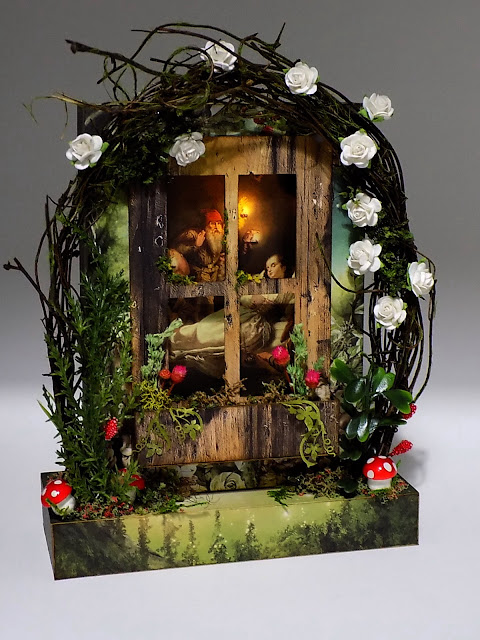
Life has been a bit crazy lately, but I managed a little art project for Alpha Stamps using the pretty Woodland Window Box Kit for April. I've been ready to make art for awhile now but found the days ending before my To Do list was completed. This kit made it possible to squeeze in some creativity which is exactly what I had been missing for so many weeks! 


I really love the new facade with an inset niche - it adds extra space around the opening of the Even Smaller Paper Theatre Box for decorating and the Window with Flower Box is icing on the cake! The finished project is small enough that, when not mounted to a platform base like my example, can be hung on a wall or displayed on an easel. How cute would that be?


I decided to glue a bunch of bushy plants and mushrooms to mine, so went with the 5x2 Platform Base. An arch of twigs were also glued to the base and, as a bonus, I got to use more of the scrummy Woodland 6x6 Paper Pad. It's beautiful paper. 


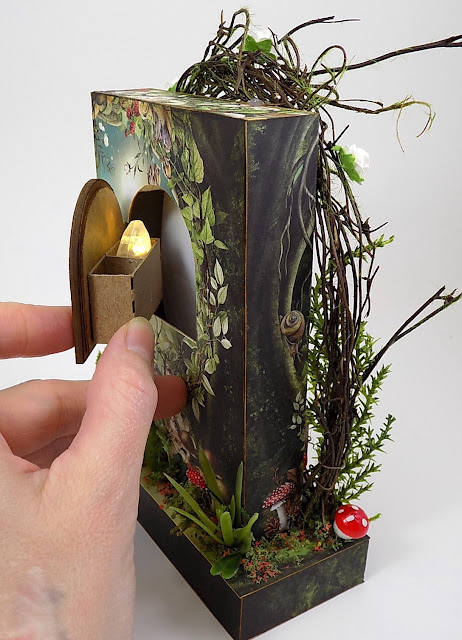
The back is fairly simple with more greenery. The window from the Decorative Windows Set 1:12 holds a surprise:


Ooooh, a light!


The Even Smaller Paper Theatre Boxes are 3/4" deep, so the wireless Single LED Light I used worked out nicely. It gave the lanterns on the collage image a warm light to shine on Snow White. 

Here's a simple walk-thru if you want to add a light to your Woodland Window Box Kit:

1. Fold your Even Smaller Paper Theatre Box together. Trace around the window from the Decorative Windows Set 1:12. I used the curved window only and not the frame. 

2. Cut inside the traced line along the bottom and around the curved top, approx. 1/16". Use a bone folder to score the box on the traced line on the uncut side for the hinge. Make a tiny cut from the curved cut to the scored line. Having that extra bit will allow the window to open properly.


3. Either fold your own, or cut a matchbox in sections like so, then glue them together so it is a solid box with no top. This will hold the Single LED Light.


4. Glue the Facade on the Even Smaller Paper Theatre Box, making sure the wider section of the facade is on the bottom. You can see the tabs of the facade just touch the cut marks for the window and the top tab is folded inward. I snipped off the point of that tab before gluing it in place. If you plan on papering your kit, remember to trace the Facade and the niche opening before gluing.


5. Cut a strip of paper to cover the inside edges of the niche. My strip is 7/8" wide x 12" long. Use double sided tape or glue.

6. To support the collage image inside the niche, add adhesive dots or foam to the corners. Glue in the box that holds the LED light. The foam dots should be the same height or a little taller.

Here is the inside of the niche showing the top of the LED box. I added a strip of cardboard in the center to keep the LED upright with its bulb extending beyond the box. The light shines through the cardstock collage image, illuminating the lanterns. I love it when things work out so perfectly.


Add your collage image to the foam dots then decorate! Yay!


Want to see all the fab goodies I used? Go right HERE!

Happy creating!

Saturday, September 18, 2021

Little Coffin Hutch

Eeek, Halloween crafting is in full swing! My entire craft area is covered in bats, skulls, spooky paper, black cats, glitter...I think all of the Halloween stuff I own is scattered across two tables (save for a teensy workspace where the cat sometimes sits). 

I finished a mini project recently using Alpha Stamps new Little Niche Shrine - Coffin. Leslie knows how much I love the niche shrines, so she sent one to play around with. (it is also possible I begged for one, whatever!)


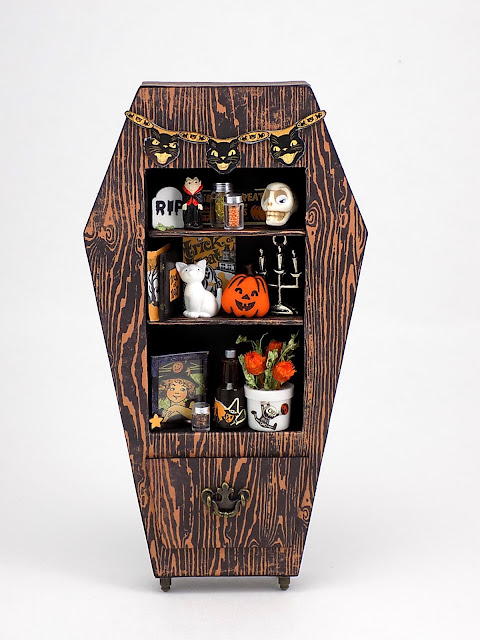
I covered the sides of the shrine and added two shelves to make a miniature hutch to use in a future project.  There's a faux drawer and spindly feet, too. A brief run-down for adding sides and shelves is down below.


The hutch is filled with a handful of retro orange and black goodies like a 1:12 Brass Picture Frame painted purply-black with a sweet witch image, re-covered Thinner Mini Books, a fun black cat bunting from the Witchy Mirror Trims Collage Sheet, and a Tiny Ceramic Vampire Bead.


There are a few Mason Jars filled with glitter and microbeads, a candelabra, jack-o-lantern, a tombstone...


a kitty, an Amber Resin Contoured Bottle with another retro image, white canister used as a flower pot, and a cute Trick-or-Treat poster all crammed in that 1 3/4" x 3" space!


It doesn't take much to transform your Little Niche Shrine into a piece of furniture - a few shelves, some feet, and giving it sides is all you need to do. 

First, paint your shrine pieces black. 

Cover the front and back pieces with paper. I chose to cut out a small rectangle in the center of the shrine front and wrap the extra paper around to finish the edges.


Cut small segments of basswood or balsa and glue them along the top, bottom, and side edges of the back piece. Glue the niche in place on the front piece.


Apply glue to the edges of the shrine and wrap a strip of paper around the shrine. This works best if you have 12 x 12 paper because one strip will wrap around the shrine. I used two strips from a sheet of 6 x 6 and made the strips meet on a corner.


The shelves are nothing more than strips of cardboard that is wrapped in paper and glued in place:

Cut two pieces of cardboard 1 3/4" x 1/2" (pssst, it's the free stuff that is shipped with collage sheets from Alpha Stamps).


Paint the edges black and glue one strip to your paper. 


Apply glue to the other side, then fold the strip upward. Cut off the excess paper. Poof! One shelf covered!


Repeat for the other shelf and glue 'em where you want 'em. Done!


So now that my coffin hutch is finished, I'm going to dig through the scattered stash for the things needed for the next Halloween project while enjoying a bowl of Count Chocula. It is Halloween, you know. 

GO RIGHT HERE to see the supplies used in the Coffin Hutch.

Happy spooky crafting!

Saturday, August 28, 2021

Witch's Potion Niche Shrine

 Anyone else ready for summer to be over? Two months ago? I'm eagerly anticipating the slightly "cooler" weather, the departure of mosquitoes, and...Hallowe'en!!! The heat and annoying bloodsuckers will be lingering long after October, but at least I have something to look forward to that isn't too far off. And being holed up in the house gives me time to make all the spooky things (or at least three). 

My latest Hallowe'en project was another small one, but I really love Alpha Stamps niche shrines. Like, really, really. I've made quite a few things from them already, however,  I recently realized each one could be Hallowe'en themed and together would be a nice mantle display. Even the egg. Is it a giant spider egg sack, alien egg, or a pumpkin (just add stem)? Pretty versatile things, those niche shrines.

I used the Little Niche Shrine - Potion Bottle for my recent creation:


The Potion Bottle was painted black before being covered with Eerie Night Cemetery Secrets Scrapbook Paper and Brimstone Bulletin Scrapbook Paper. I sanded the paper here and there for that aged look. There's a Tiny Dot Dresden Borders - Black trim around the niche opening. 


The center was wallpapered with Witches & Wizards 6x6 Paper Pad before a bunch of stuff was tucked inside. There's a tiny shelf to hold a few tiny things like a teensy witch hat! I chopped a bit off the Rustic Broom to make it fit and painted eyes on the cat


There is a skull in there, a few rolled up spells, bottles of potion ingredients, and a crystal ball. The potion smoke is green wool roving left over from my needle felting days. (It was short-lived. I only have time for one craft with pointy sticks and I'd much rather knit socks.)


The neck of the bottle was wrapped with wool and I added a Bronze Spider Charm. The back was covered with snippets from the Witches & Wizards 6x6 Paper Pad, the hanger glued on, and then it was finished! 


Stay magical, folks! And thanks to Leslie for waving her wand over my awful photos and making them pretty. :)

GO HERE to see the supply list for the Witch's Potion Niche Shrine!

Sunday, September 15, 2019

Happy Halloween Tiny Shrine

Can it be?? Is Hallowe'en really just six weeks away?! Nooooooooooo!!! I still have a giant pile of spooky things to make!

This latest Hallowe'en project was a quickie craft mostly because I have been too busy all week to do anything creative. How sad. So today I told all of my smallish people to pretend I was invisible. Someone decided Boo Berry was a suitable lunch.

I had been sent a sweet Small Simple Shrine from Alpha Stamps and right away knew I had to use the Articulated Skeleton (ahem, his name is Hubert) for this project. He fit so perfectly!


I basically just covered the entire shrine with paper from the Happy Halloween 6x6 Paper Pad and painted the inside. There's a Creepy Tree in there, and a Tiny Tombstone, Hubert, of course, as well as a snippet of Gothic fence! Hubert is holding a Halloween flag made from a toothpick and some text from the Retro Halloween Cards and Tags collage sheet. And since I live in a spooky southern city, I had to add creepy moss to the tree. Fall foliage was used to cover the bottom. This shrine is about 1/2" deep and held all of that with room to spare. Pretty impressive!


Here is the back minus the small picture hook that belongs on the back. The shrine is so small (2 1/2" wide x 4" tall) that it will fit nearly anywhere. Hubert is going in the bathroom once I get to the hardware store to pick up the hook. Since the smallish people (at least one of them) ate monster cereal for lunch, I suppose I will wait until tomorrow to get the hook and instead cook something decent for dinner.


Guess what? I managed a super fast second project after dinner! I was cleaning up after the speed craft episode earlier and made three treat bags. Using the super cute Retro Halloween Party Invitations collage sheet, Happy Halloween paper, and All Hallow's Eve paper that was strewn about the craft table, I managed to create three simple treat bags for a party. 


I made paper medallions from black or orange crepe paper, layered a circle of mesh fabric on top of that, followed by a circle of scrapbook paper, and finally an image from the collage sheet. Pretty basic. Kinda cute.


I'd like to say I'm going to clean up the disaster that is now my craft table, but with only six weeks 'til Hallowe'en that seems pointless. Might as well leave all of this stuff out and craft all the things!

You can go HERE to see the supplies I used.

Happy Hallowe'en crafting to you!


Wednesday, August 14, 2019

Hallowe'en Party Shrine

Anyone else ready for a cool Autumn breeze? It has been unbearably hot here, like, if-you-go-outside-you-will-burst-into-flames unbearable, so even a temperature less than sweltering would be welcomed. Not interested in being aflame, I turned off all the lights, removed as much clothing one can before upsetting family members, and huddled over a little Hallowe'en project. 


it's so hot the camera melted

I covered an Arched Shrine Shadowbox (which is about 6 7/8" tall by 4" wide and 2 1/2" deep) with paper from the very cute All Hallow's Eve 12 x 12 Collection Pack. Deciding which paper to use was nearly impossible. There are goofy little pumpkins, happy ghosts, and a damask pattern (with cats!), but in the end, I went with the stars, dots, and witchy hats and legs.


The table is made from a Set of Wooden Table Legs and a rectangle of basswood. It was stained with watered-down brown acrylic paint and a scrap of fabric was glued on top for the tablecloth. 


I was happy to have a 3-Tier Cupcake stand handy because otherwise I would've run out of space pretty quickly! (Actually, there's still surface area there...darn.) All of the cookies on the stand as well as the black and white checkerboard cookies and bats and ghosts are simply slices of polymer clay canes. The white cakes were made with a Mini Bundt Cake Silicone Mold and a dash of glitter. The moon and star cookies were also made with a mold (Mini Halloween Icons Mold; I LOVE this thing), plus more glitter or Liquid Pearls. The ghost on the top of the tiered stand can also be made with that mold! I "free-sculpted" the lollipops, cupcakes, and witch hat treats, so that's why they're a tad lumpy. They are also microscopic, which could be part of the reason. The metal cookie tins were covered with strips of washi tape and the round tin got a vintage image for the lid. 


Aren't those masks fun? Can't have a party without those! The elastic bands on the back is just sewing thread. Love those kooky pumpkins too!


And lastly, here is the shelf along the tippy top. It was stained like the table and I glued a squiggly length of Miniature Orange Tinsel Garland to the front. The banner was cut from the Halloween Clock Spinners collage sheet and the clock is another vintage image glued to a button. I searched for two hours for the tiny watch hands that "were right here yesterday!" and after locating them (in a tiny bag that was taped to the sewing machine so I could find them, ahem), they were stuck to the front of the clock. Along the shelf are kitchen canisters with Tiny Halloween Black Stickers stuck to them. They originally had "flour", "tea" and "sugar" written on them, but a quick scrape with a scalpel removed them. The lid handles are colored with a Sharpie. You can't see it, but the pickle jar on the far right has a removable lid so you can fill it with whatever creepy stuff you'd like. I found some moss on the cat's tail...she didn't seem to care.


Mother Nature has just delivered a torrential downpour. If going outside was difficult earlier, it is now impossible. Not because of the rain, but because the humidity is now around 900%. Yay. Guess I will have to make something else. It's a good thing I have a giant box of Hallowe'en goodies from Alpha Stamps!

Here is where you will find a List of All Supplies used!