I know it is September (aka Spooktember, when all the Halloween crafting happens) but an exception was made after receiving a Mushroom Niche Shrine with Arched Door and collage sheets filled with tiny gnomes from Alpha Stamps. I might have squealed a tiny bit.
I say this every time a new Niche Shrine is announced, and it is always true, that this one is my absolute favorite. Mushrooms, gnomes, and shrines? Yes, please!
Shall we give a knock and see who's in? (I love that bitty door handle.)
What is going on in there?! Is this the party mushroom?
Looks like Kerfoot is only interested in prepping potatoes for future batches of whatever's gotten the rest of them so happy.
Now, how exactly did eleventy-thousand gnomes cram into one mushroom house?
Oh-ho! The mushroom is a tunnel book! (A tiny one, but one nonetheless.) I have had an idea for a gnomish tunnel book for a while, so when the Mushroom Niche Shrine arrived it just seemed like the perfect opportunity to create it.
Let's make a gnome home!
What you see here are the front and back parts of the Mushroom Niche Shrine and the tunnel panels of the 4x4 Arch Tunnel Book. I placed the first tunnel panel on top of the mushroom front and traced around the opening to create a new doorway:
The top right is the mushroom front with the new door cut out. The mushroom front was placed on top of each of the tunnel panels, and I traced the curves of the stem along the top corners. Those got chopped off:
Next, paint the backs of the tunnel panels black (optional) then paper the fronts. I used the paper in the Mushroom House Kit; it's very gnome-y.
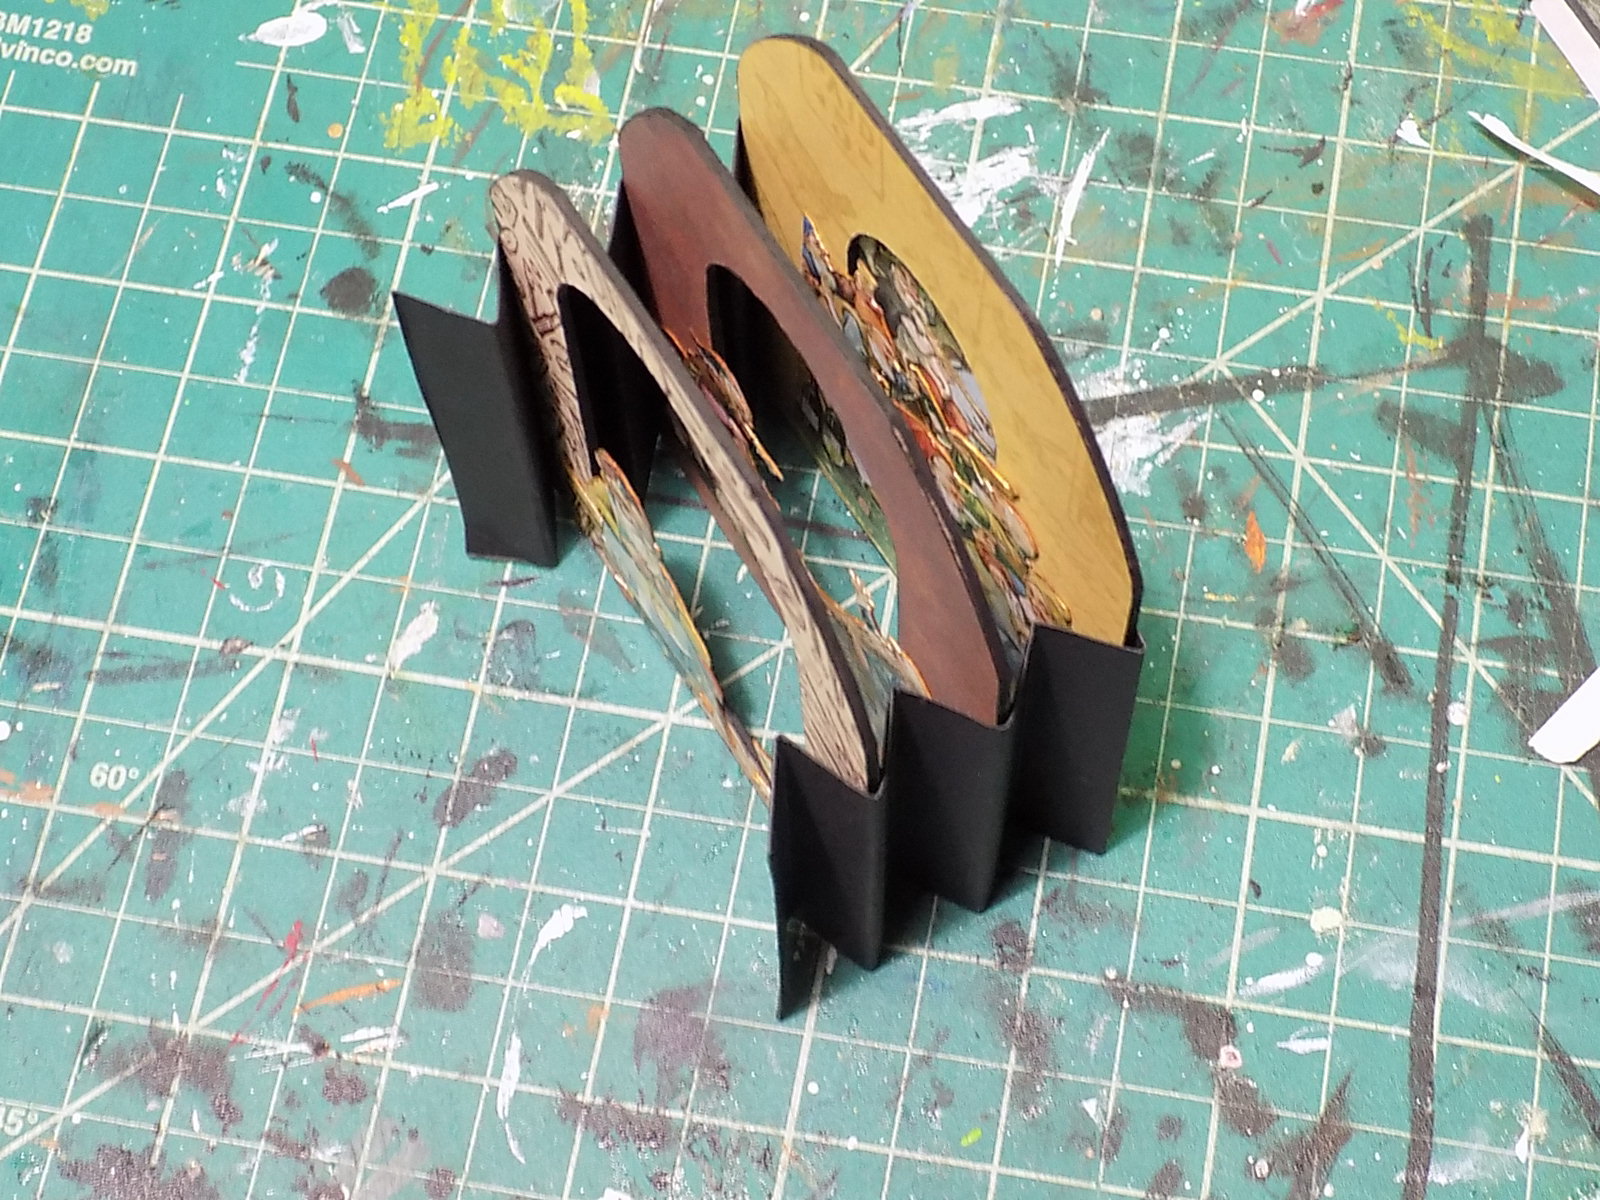
Next, cut two strips of paper 2 1/2" x 5 1/2". Make marks at 1" intervals on the long side. Flip paper over and make marks 1" apart beginning at 1/2". Using a bone folder, crease the paper at each mark, then flip the paper over again and crease those marks, too. Accordion fold the paper strip. Repeat for the other strip of paper. (Or use a scoreboard if you have one of those.) Cut the accordion piece at 3 1/2" then cut the remaining 2" section in half. Repeat with the other accordion piece. You will have two 3 1/2" accordion sections and four 1" pieces with folds. We'll call those shorter pieces "flaps".
In the above photo, I have added strips of double sided tape to the 1" flaps and attached them to the backs of the first and second tunnel panel. Ignore the other 1" flaps in that photo- those were spares.
Time to attach the two tunnel panels to the accordion folds - exciting! Remove the backing from the tape and attach the flap to the 3rd fold of the accordion. Here's another delightfully fuzzy photo for you so you can see exactly where those flaps go...
This photo is a bit better. Sort of. Well, the idea is the very first fold of the accordion will be glued to the back of the Mushroom front, the next fold has the first tunnel panel, followed by the second tunnel panel. The last fold will be attached to the third tunnel panel before the entire panel is glued to the Mushroom Shrine back. Since the third tunnel panel is glued to the mushroom back, no flaps were used on it.
Using the flaps to attach the panels makes tunnel book making so much easier in my opinion. The book can easily fold together if you choose to create a book that closes.
Moving on to the mushroom front! This part is super duper easy. I wanted a 3D effect and chose to use Creative Paperclay. To make certain the clay would stay put and not separate from the chipboard, I covered the mushroom with gesso followed by two coats of tacky glue. There was a slight amount of warping as the clay dried, but it was minimal.
And we're shaping, la, la, la...
Done! It dried for two days before I painted it with acrylic paints. I also painted the back mushroom piece.
For the door, I traced around the opening of the mushroom onto the brown paper. An additional 1/8" was added around the perimeter, the paper template was cut out, then traced onto a thin sheet of basswood. Cut out the shape and there's your door! Paint and decorate as desired.
To attach the door, first glue the hinges on the door. Place the door over the opening and apply more more paperclay around the sides and over the part of the hinge that's touching the mushroom. Let dry. Touch up the paint.
And there you have it, a wee mushroom house fit for (at least) 10 gnomes.

Don't forget to make a tiny lawn for your new gnome home, complete with autumnal shrubs and a teensy planter! Oh, and see the light wood planters on both sides of the lawn? They're beads!
Cute!
Now it's time for more Hallowe'en crafting...yay! GO HERE to see a list of supplies used. Have fun!