Wednesday, July 21, 2021

Chasing the White Rabbit Half Scale Theatre

I love little things. I also love Alice in Wonderland. But what I really love is little Alice things! 

The Half Scale Theatre Cabinet w Facade - Deep from Alpha Stamps is a perfect size for miniature things whether they are Alice or not. The theatre is approximately 3-1/2" tall x 4-1/4" wide and 2-1/2" deep when the doors are closed. That's pretty small! I could see a Halloween scene inside - tiny tombstones and creepy trees or maybe a pumpkin patch with a scarecrow? 

Halloween will have to wait a bit longer because this deep theatre is all about Alice.


I started by painting the theatre edges black, then papering the entire thing using the Alice 8x8 Paper Pad. One of the sheets in the set has a collection of frames that happened to fit nicely inside the doors of the theatre. The rest of the paper is perfectly wonderful.


On the left is Alice herself with a key in her hand, curious as to where the White Rabbit could be going! Something else that worked out with this project was the size of the doors from The Garden Of Books Chipboard Set of Doors. After painting it with diluted ink, I added paper hinges to the back of the door and stuck it right in the center. The checkerboard flooring from the Tiny Alice Wallpaper Prints collage sheet was glued in at an upward angle to cover the gap between the door bottom and theatre floor. The same thing was done on the other side.


The center portion of the theatre was devoted to the White Rabbit's cottage mostly because it is one of my favorite parts of the book. I chopped up a Creepy Tree - 5 Inch to fit inside and used bits of Variegated Green Vines for leaves and bushes. The cottage is a Little Bird House chipboard kit with collage sheet windows and door, raffia roof, and wooden step. The "hill" used to be a foam pumpkin, but it was an easy transformation. 


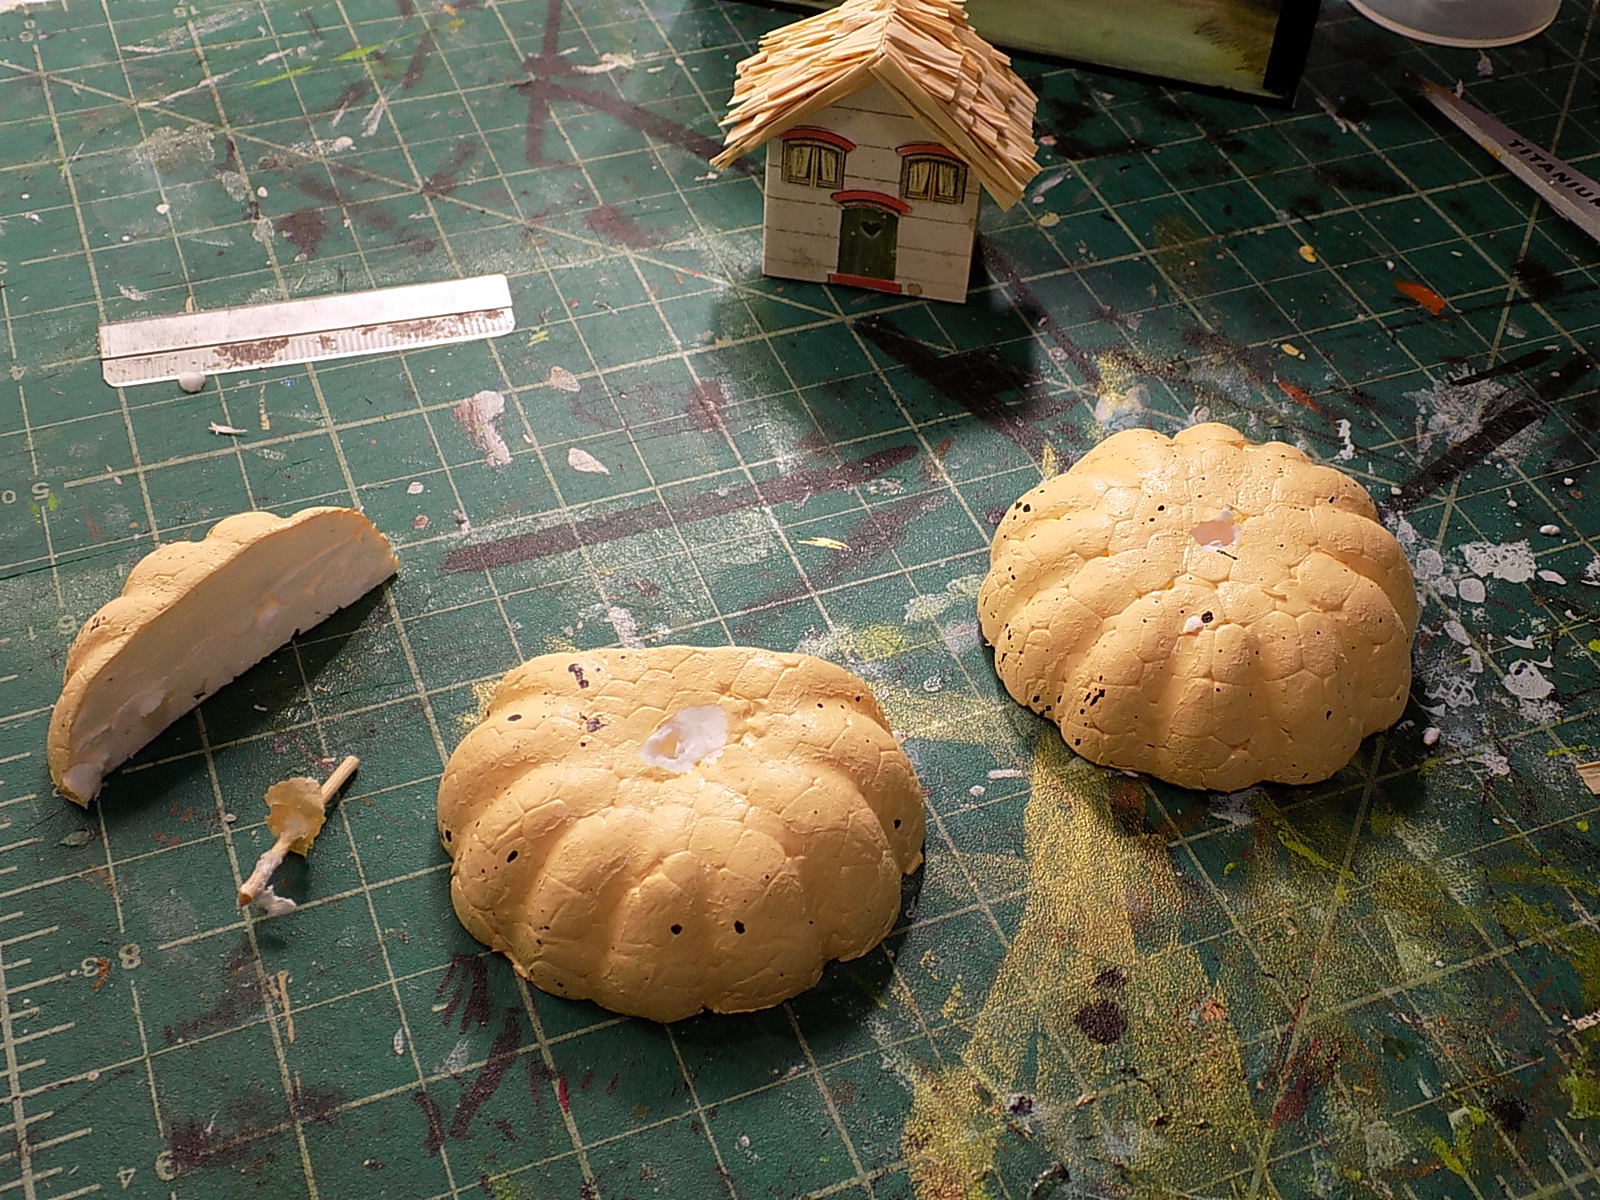
To make the hill, cut your foam pumpkin in half. Measure and cut part of the pumpkin off so it fits inside the center of the theatre. Remove the stem.


Paint the hill and slather it in glue, then sprinkle on Green Turf Grass. Tamp the grass and add more if needed. It helps to use lots of glue! Once dry, glue the cottage on top. 


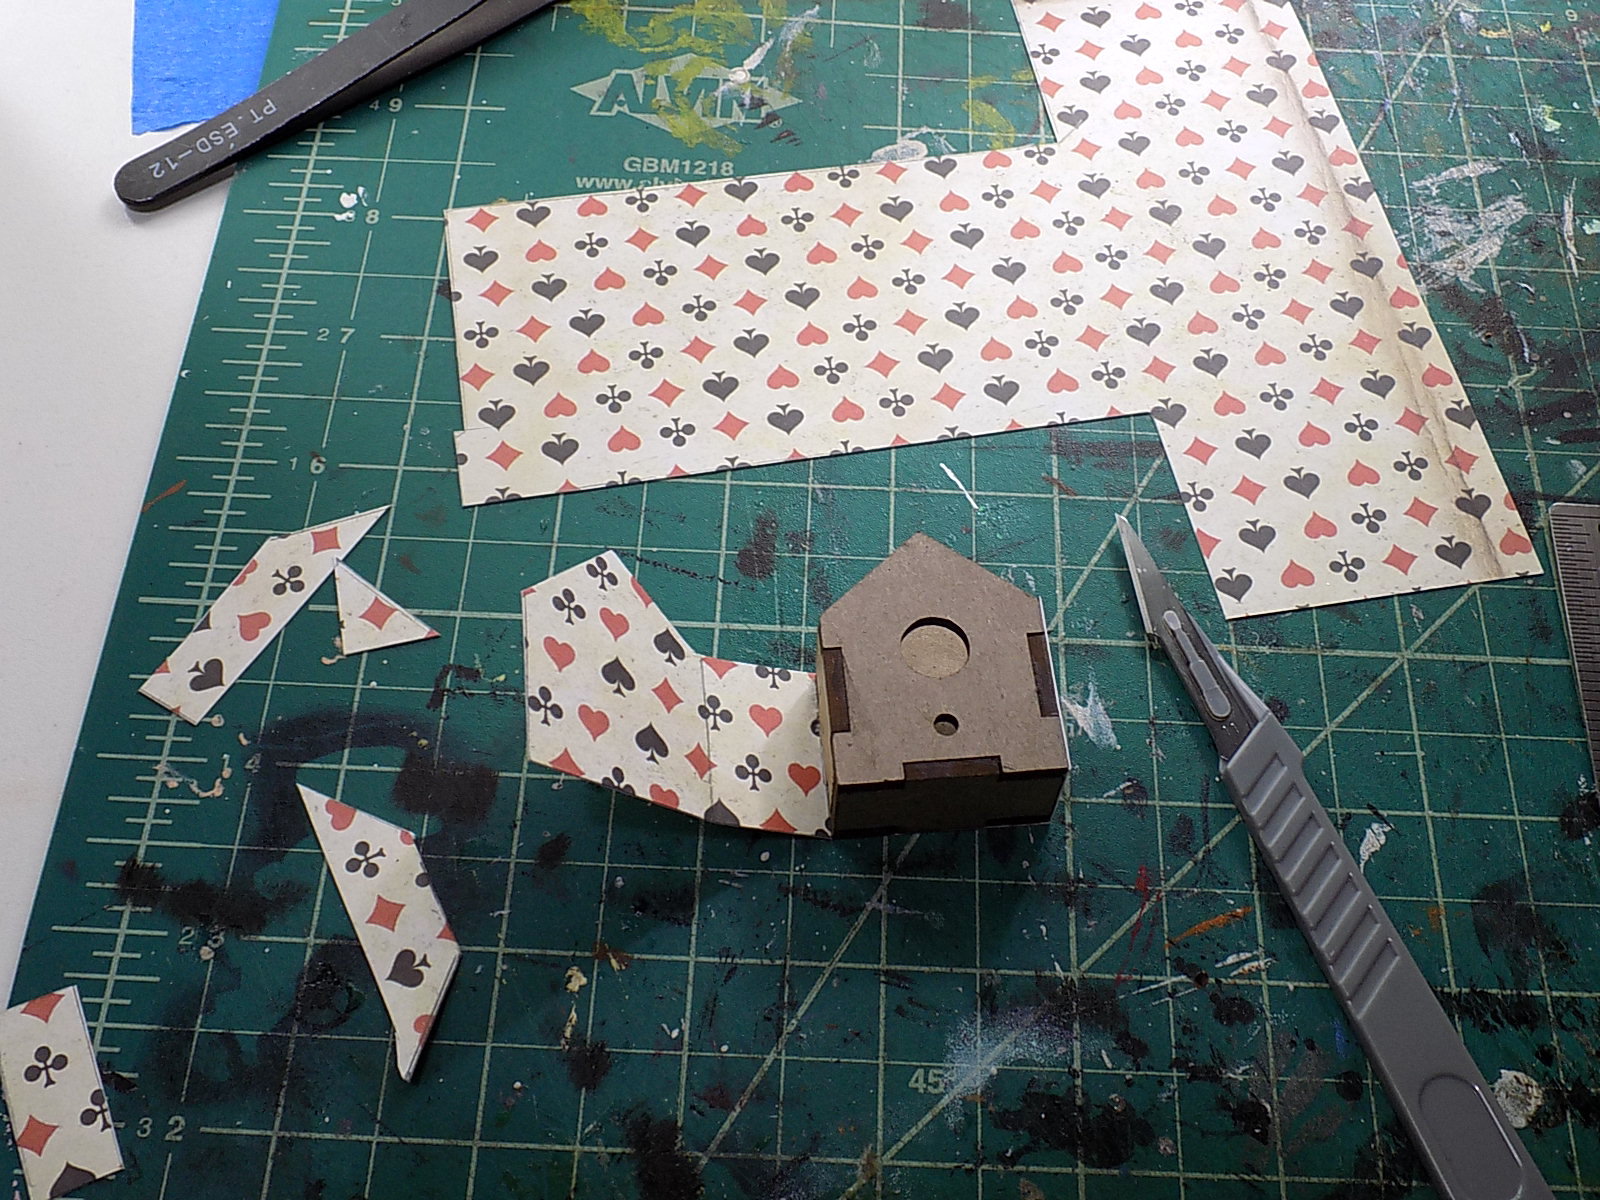
I also like to make things as simple as possible, so oftentimes I choose to wrap 3D chipboard kits with paper vs gluing and cutting each side individually. For the cottage, I cut a length of paper the height of the chipboard and glued one side down. Cut off any overhanging paper (the peak of the roof in this case). Roll the chipboard to the left and crease the paper along the fold. Add glue to the side and adhere it to the paper. Cut off excess. Repeat. 

Okay, story time. The outside of my theatre is basic and maybe a bit dull, however, there were plans to decorate it, too:


Those plans were thwarted by the disastrous effects of old, cheap paper glaze and my Alice collage image. Sigh. See the blue? Yeah, it's not supposed to be blue. In the end, I told myself the theatre doors would be open all the time anyway, so it wasn't that big of a disappointment.


And, lastly, I nearly always forget to take a photo for scale. Luckily, Chief Operating Officer Minicus Moo takes her job seriously.


Hope you enjoyed the miniature theatre, now go glue stuff to stuff!

Don't forget you can go HERE where you'll see the supplies used in the Chasing the White Rabbit Theatre (cat not included).

Saturday, July 3, 2021

Feeling Beachy: Two Altered Tins for Summer

 I can no longer deny it. Summer is here. It's hot, humid, and buggy. Even the cat won't venture out today. That's why I am so glad to have received July's Seashore Kit from Alpha Stamps! Lots of lovely things to play around with and keep me occupied while everything outside melts.

My first project is a simple Mermaid Garden tin. I'm a huge fan of tin inserts and used one from the Altoids Inserts Vignette - Set of 3 along with several chipboard pieces, like the new Sea Scape Layered Corner. It's so pretty!


I managed to squeeze in some sea grass and a few pieces of coral inside the tin with the mermaid. Some of the chipboard was painted with acrylic paints and glitter, and others were covered with texture paste before painting. 


The paper in the Seashore Kit was my inspiration for all of the colors used but you can barely see it behind all of the bits! 


If you are new to using Altoid Tin Inserts, here are a few pointers that I hope you find useful.

1. Tin Inserts can be used on the inside of the tin (under the "lip") or on the outside.

2. Some advantages of using the insert on the outside are not having to alter the color of the lip to match your project (unless you don't mind that it's silver because that's okay too!) plus the edge of the insert creates a nice place to glue cording, ribbon, beads, sticks, or whatever around your tin. The disadvantage is you can't use the cover of the tin.

3. Placing the insert on the inside means you can leave the cover on the tin and have a beautifully framed surprise inside. If you use the insert this way, just remember to trim any paper on the inside a little shorter than you normally would to accommodate the width of the insert:


And while uploading the insert pic I found another that might be helpful. I coiled the Woven Sea Grass from the kit around the spool base of my tin. To make it easier to glue, I wrapped the woven sea grass around a dowel and taped it with blue painter's tape. It was perfectly coiled after just a few hours, no water necessary!


There are so many pieces to the kit that I found myself making another tin for my MIL. She and all of her high school girlfriends make an annual trip to a beach and spend a week together, so I thought I'd make her a little gift that represents her friendships and love for the beach. 


I wanted to highlight the Vintage Artistry Shore 6x6 Paper Pad this time and put it on the front of the project (and all over the inside because look at it).


There are a few shells from the Etched Chipboard Seashell Set, a curvy frond, and an image from the Shells & Souvenir Postcards Collage Sheet on the left...


and the Fairy Tale Frames Altoid Inserts Set, woven sea grass, and two lovely ladies from the Vintage Beach Babes Collage Sheet on the right. That's it! 


The outside is equally plain with just a few Loopy Chipboard Scroll Corners, some layered filigree, a Medium Patina Starfish Charm, and a few flat-backed pearls. The rim of the lid was covered with a strip of Tiny Scalloped Fleur Dresden Borders - White before calling it finished. 


Using filigree in projects isn't something I normally do, or do too often, but I think the layered effect looked nice on the front of the tin. 

The assembly of the tin went something like this: 

1. Cover the front, back, sides, and inside with paper, making sure to leave that tiny gap on the inside for the tin insert.

2. Add Woven Sea Grass inside tin. Arrange bits until you're satisfied.

3. Paint the back of the tin insert and glue paper to the front. Cut out the paper from the center of the insert and then around the edges.


4. Add pop-dots to the back of the collage image and place inside tin. Paint all chipboard pieces and glue in place.


5. Arrange a few pieces of filigree to your liking before gluing them together with Glossy Accents. Let dry, then paint with a few thin layers of acrylic paint. I started with a darker aqua color and added lighter colors for each additional layer. Finally, accent the piece with a white gel pen. 


As soon as it is less miserable to be outside, I will deliver the gift. She may get it sometime in October.

You can go HERE to see the supply list for the Mermaid Garden tin and HERE to see the goodies used in the Beach Babes project. 

Stay cool, have fun, and make art!