Showing posts with label house. Show all posts

Saturday, April 22, 2023

How Does Your Garden Grow? Altered Tin

 It seems like a lifetime ago when I last made anything other than bento. I hadn't made actual art in some time and was in desperate need of creating something other than lunch. Thankfully, Leslie saw this and graciously sent a box chock full of miniatures, blank altoids tins, tin inserts, mini metal garden items, model landscape material, mini building supplies...it was a giant box!

I eventually decided to create a mini garden cottage inside a Blank Altoids Tin using the Altoids Shelf Insert - 2-1/4 Inch Wide and a super cute (and very tiny) Half Scale Georgian Pediment. The outside of the tin is simple - a lovely gate and some roses:


After papering the entire tin, I added the gate to the front, then glued on a few sprigs of this fantastic Dark Green Camouflage Foliage. The roses are teensy bits of Mini Blossoms Mix - Fuchsia Pink. 


And here's the inside of the tin with the garden cottage and the smallest wheelbarrow you've ever seen! It's a hefty metal miniature painted with acrylic craft paints. It got a quick scrub with some dish soap to remove any mold-release residue before painting. Next to the wheelbarrow on the right is a Quarter Scale Antiqued Window Box under a Tiny Trellis. So small, so cute!


The roof of the cottage is the Half Scale Georgian Pediment mentioned earlier. I altered it a tad and have a basic tutorial for that below. You can see lots more of the Dark Green Camouflage Foliage inside the tin as well as a few Green Foliage Bushes and Variegated Green Vines. The Green Foliage Bushes are the grassy tufts with little leaves in the corners of the tin. I cut the tufts to fit and they are perfect! The small tree was made with a twig from the Dark Green Camouflage Foliage, a rolled ball of Variegated Green Vines, and some yellow flowers (or maybe lemons?) from the Mini Flower Border - Yellow


The cottage rests on Altoids Shelf Insert - 2-1/4 Inch Wide. It is three chipboard pieces with slots that fit snugly in the bottom of the tin. I painted the insert pieces, glued them inside the tin, then added air dry clay cobblestones to the front. The cobblestones were painted and some Green Turf Grass was sprinkled here and there. The front piece of the shelf insert attaches to the top piece slightly behind the tin lip, creating a recess wide enough for the cobblestones, but it's also a great place for a label holder from the Fairy Tale Frames Altoid Inserts set. Or filigree!


And here is how it came together:

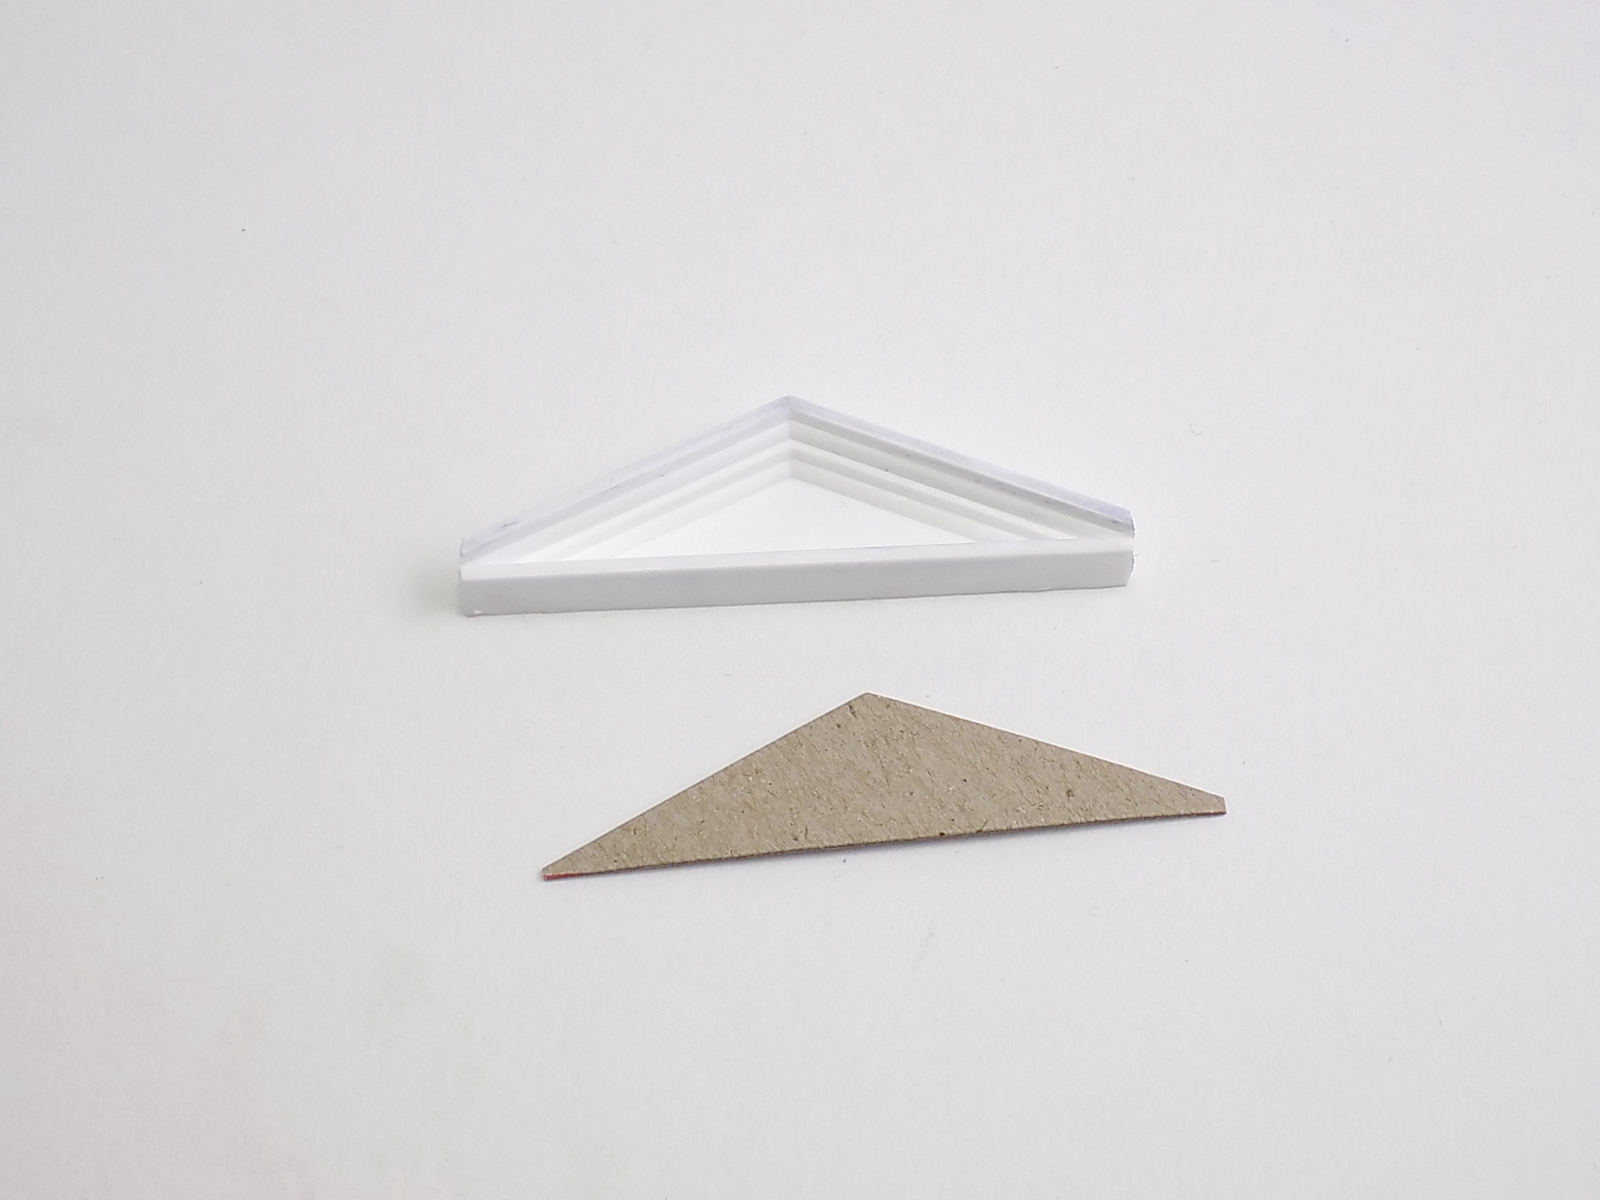
The Half Scale Georgian Pediment was slightly too wide to fit inside the tin so I sanded the ends before painting it. I cut a triangle of cardboard to fit over the front, then painted strips of black paper to look like shingles. The strips were glued to the triangle, trimmed, then it was glued to the pediment. I also added shingle strips to the rooftop.


The rest of the cottage is a square of cardboard with a brickwork collage sheet image glued to it along with a window and another collage image. The two 1/8 Inch Square Wooden Dowels push out the cottage front so it aligns with the roof. 


In this last pic you can see the insert in place and the drying clay cobblestones. This was taken after the cat stepped on it. I might have freaked out and scared the cat with my screaming which made the situation worse because then everything went flying as he tried to get away, but the tin survived. Mostly.


And so did Tim. 💕


All of these goodies - except for Tim - can be found at Alpha Stamps or you can go RIGHT HERE to see the supply list for this project.

Happy creating!

Saturday, January 15, 2022

Alice is in the House

 I was straightening up my craft area recently when I came across all of the lovely Alice Through the Looking Glass paper pads from Alpha Stamps. How could I have forgotten about them? They're so pretty! The discovery of the paper pads lead to digging around in the chipboard drawer, pulling out little shadowboxes and houses, then shuffling through the miniatures for a teapot, and heaving the 2" thick hanging file full of Alice collage sheets onto the table. So much for cleaning...

The results? Cute little interchangeable shadowboxes with all of the Alice paper!


The boxes and houses were covered with paper from the 6x6, 8x8, and Backgrounds 8x8 pads. I was careful about which sections to use because I thought of eleven more projects to make while flipping through the pads. Hmm, maybe I need more paper.


The accessories inside the shadowboxes are mostly chipboard pieces, like the chair from the Tiny Chipboard Alice Props, and bronze charms:


The table on the right is really a Tiny Metal Bird Bath. The top was removed and a disk of chipboard was put in its place. The teal tray came from the White Plastic Mini Serving Dish Set. I sanded it a bit and painted it with craft paint. There's more chipboard pieces and bronze charms here and there, plus a wee mouse! Both the Grass & Mushroom Border - 6 Inch and 3D Chipboard Tree - 3 Inch were chopped to fit. 


The houses and boxes aren't attached so they can be rearranged or live separately. My daughter had claimed the larger shadowbox with Cheshire Cat, but she changed her mind when I mentioned that one also had her and her twin in it. Guess I get to keep all of them to enjoy (and the paper does look better when it is used vs left untouched on a shelf, unless you are the cat that had been sleeping on it).


"i will knock that over later"

All of the goodies are HERE!

Now go get crafty!!


Wednesday, November 17, 2021

Petite Paper Village Ornaments

 Here's a quick and easy project you can finish while also managing the holiday hustle. It involves simple cutting, folding, and gluing. That's it! The best part is you can make as many parts as you want and they can be hung on a tree, used as gift tags, or, for those adventurous crafters, cut out a bunch for an Advent calendar. So, what in the North Pole am I talking about? 

Tiny glassine envelopes with a surprise inside! 


See? Super easy! The ornament is nothing more than an envelope with a tag-shaped rectangle of scrapbook paper adhered to the front, followed by a red punched doily, then a holiday collage sheet image. There's a sprig of holly garland and a tiny red ribbon hot-glued on the top. I punched a little hole in the scrapbook tag before sticking it to the envelope so a length of baker's twine could be strung through. I had six finished in two shakes of a reindeer's tail.


Now for the fun part: what to put inside the envelope? I'm a sucker for paper toys of all kinds, I just love them. When Leslie asked if I would like a Miniature Paper Model Christmas Village, my reply was SEND THEM ALL! followed by a shocked cat emoji. She's probably used to that by now.


The tiny village would be especially festive surrounded by artificial snow and fairy lights. One ornament could be removed each evening, the building assembled, then placed in the snow. There are also people, animals, trees, and fences included on the model sheets, which are plenty of additions for a countdown calendar. 


Oh my, so cute!!


Oh my, so small!


I think I want to cut out all of the villagers and kitties now...hope you enjoyed the petite paper village ornaments!

Supplies Used:


Saturday, May 22, 2021

The Dark Shrine

 The Bird Watcher Kit for this month from Alpha Stamps is  such a delight! It has a Mini Birdhouse Shrine, pretty papers, the Petite Birds & Nests Half Sheet, mulberry paper flowers, and a bunch of other stuff to create something lovely! Maybe an ornament for a bird-loving friend? A tiny garden shed? Lots of possibilities!

But I didn't do any of that. I think I miss Hallowe'en.

The Mini Birdhouse Shrine fit nicely on top of two Window Boxes with Gothic Facades with room left over for a perimeter of black and red roses.


Most everything was painted black, but a collage sheet image was glued to the back to lighten things up a bit. 


After painting everything black, I used a woodgrain patterned stamp for the walls of the shrine. The window boxes were also painted black but wrapped with Black Woodgrain Scrapbook Paper and Half Scale Widows Walk Fencing was added.


Inside the shrine is a teensy table from the 1/4 Scale Dining Room Furniture Set (painted...black), a detailed skull, and perched on top is an American Crow. The bottom is covered with lichen, moss, dried lavender buds (smells great!), and a few sprigs of dried German statice. 


The base of the shrine is just as easy to put together as the shrine, and the shingles are snippets of the same black woodgrain paper used on the base. The pretty Loopy Chipboard Scroll Corner finished the top. Here's a quick run-down of the assembly:

1. Paint all the things black. Stamp some things if you want. Glue two Window Boxes together. Cover with woodgrain paper. Assemble shrine.


2. Cut two pieces of floral foam to fit inside the window boxes. Paint the foam black. Glue Half Scale Widows Walk Fencing around the new base.


3. Glue finished shrine on top of the window box base. Paint paper roses and leaves if desired, then stick a bunch of them in the foam. Add cobwebs.


4. Cut long strips of black woodgrain paper, then cut into smaller pieces to use as shingles for the roof. I roughed up the edge before gluing. Repeat for other side. All done!


Now I need a second Birdhouse Shrine for all of my lovely Bird Watcher things! :)

Go HERE to see a supply list and HERE if you're itching to make something a little dark. Happy creating! 


Saturday, March 27, 2021

Pixie Palace

 Normally, I like to create small things: half-scale miniatures, knitted socks, three inch embroideries, that sort of thing. But sometimes you gotta shake things up to keep it exciting, right? I guess that's what I was thinking when I made a 1:12 scale Pixie Palace for any wee folk living in the backyard. 


The Pixie Palace was constructed from many great things from Alpha Stamps, including two Octagon Room Boxes stacked on top one another for two floors of living space. It is about 17.5" tall and 15" wide - I'm pretty sure my last three projects could fit inside!


There's a cute rustic door (it does open!) and a planter box with trellis on the outside, and a few windows with mica tile panes sandwiched between. The outside is covered in lichen, climbing vines, foliage, and plants


On the first floor is a stone fireplace and dry sink. Upstairs is the bedroom with a cute bed and a bookshelf with drawers.


I covered a Narrow Victorian Fireplace with paperclay and tiny pebbles to make it look like a stone fireplace. The flooring is jumbo craft sticks cut to resemble tree rings. The color was nice, so I left them bare. More on that later.


There's a black metal pot hanging over the firewood, plus a bunch of tiny things on the mantel like a green jar, a half-scale crate of mushrooms, plants, a different bitty metal pot, and a bowl. I also see a wooden chair, dutch oven, wooden spoon, and...is that a cocktail umbrella in the background?


Here is the kitchen area, all ready for a quick bite to eat! There's a dry sink, hand pump, pail, and soap dish. Next to the sink is a fern stand used as a table, cheeses, a basket for fruit and sweets, wooden bucket, thimble planter for pink flowers, pumpkin pods, a metal dish of apples, and a barrel planter of grass.


Above the fern stand is a spice rack with a towel bar that's perfect for hanging plants, herbs, or even a sickle! An assortment of jars sit on the shelf: red jam, a mason jar, baby food jar, metal apothecary jar, and a fun creamer with flowers tucked inside. I crocheted a window valance and added a candle to a pop top "candleholder". 


I love the wee bed on the second floor! It's actually part of a bunk bed, so if a second pixie decides to move in, all I will need to do is add the top bunk and knit another blanket. 


In the corner is a pretty pitcher and basin set sitting on a spool, a square planter, a paper label, and a snippet of an advertisement. 


I used the Bookshelf with Drawers for storage but altered it a little with paperclay. Adding paperclay to a chipboard kit can totally transform a piece. Before covering the bookshelf with the clay, I painted it with gesso to make sure the clay would not warp the chipboard. I have done this with multiple chipboard pieces and have never had any issue, even when I wet the clay to shape it. Sometimes I also add a light layer of glue before slathering the piece with paperclay, but mostly on heavy things like the stone fireplace. The final layer is acrylic paint:


The flooring in the bedroom is the same as the first, jumbo craft sticks, and I've added thin strips of basswood along the floor and walls, just as before. There's a matching crocheted valance (I was going for a spiderweb-type curtain), another thimble planter with roses, a few wooden buckets, and bits and bobs crammed on the shelves. I also made a frame from some sticks, then hung the squirrel picture from a thumbtack. 


Minicus Moo is Chief Operating Officer and oversees all projects, especially ones involving itty bitty fragile miniatures or yarn. She has told me the doorway needs to be taller :/


The beginnings of Pixie Palace. I cut a window and doorway from the panels before gluing them in place. And you can see in that blurry photo above how I drew lines radiating from the center front of the room to the corners of the walls, then cut the jumbo craft sticks to size. They were glued down with regular Tacky Glue. 


Under all of that paint, moss, vines, lichen, and plants is the base of the Pixie Palace. Aluminum foil and 5 pounds of paperclay! I smooshed the foil together before hot gluing it to the stacked room boxes, then proceeded to cover the entire thing with clay. It took a few days to cover and a few to let it dry. You can see the windows and door were installed beforehand. I added a mica sheet to the back of the window frame, glued the window in place, and added a second window frame on the inside. If you do this, make sure you paint both sides of the frame since it is visible between the glass.


Oh look! Pixie Palace is let at last!

Thanks to all of you who have made it this far; you've come to the best part. The supply list! Instead of linking every bit of detail in the blog post (that would be silly), you can view all of it in one go by clicking RIGHT HERE. Cat not included.

Happy mini making!!!