Saturday, January 2, 2016

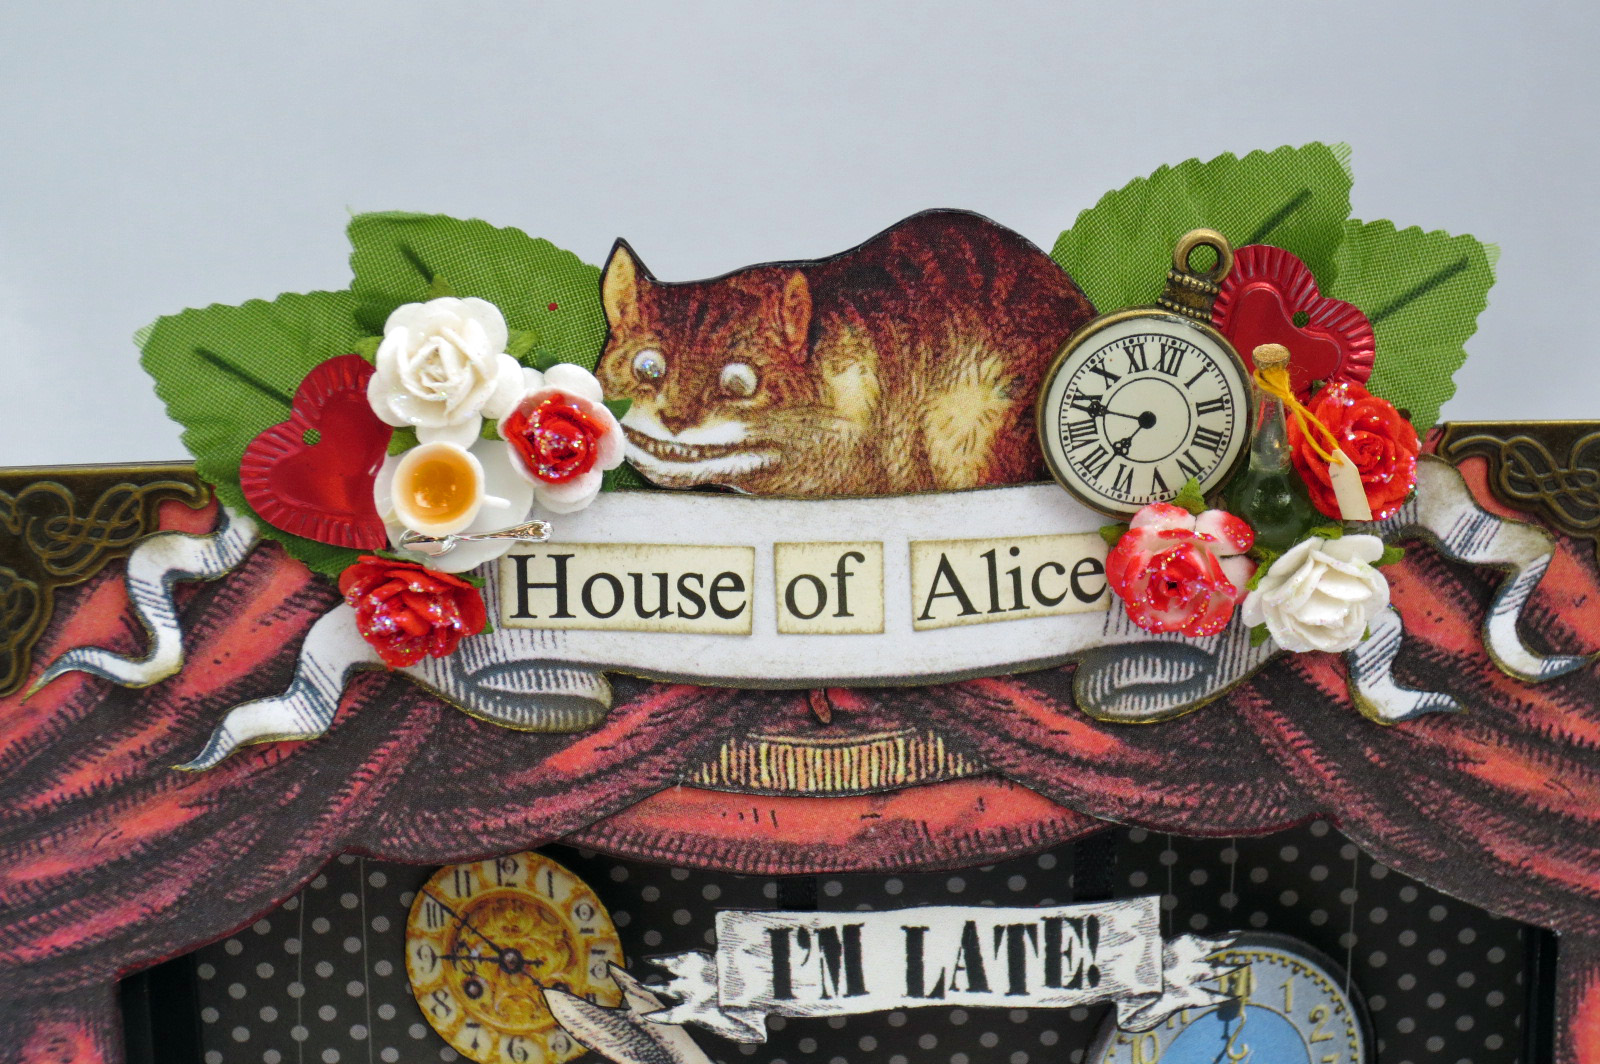
House of Alice Theatre

Alice in Wonderland intrigues us all, doesn't it? We love the curious little girl that dives headfirst into a strange rabbit hole, looking for the next adventure. We love the absurd language and strange characters and the nonsensity (is that a word?) that has us laughing and at times guessing at what silliness is going on.  I thought of Alice when I learned Alpha Stamps had these spectacular new shadowbox theatres and decided to put the book on stage, so to speak.


The shadowbox theatre is 1" wide, making it the perfect depth for some interchangeable chipboard scenes. The scenes are built on panels that look like this:


Thick chipboard panels

Thick chipboard panels for backgrounds
The length along the top edge of each panel is 5 1/2", the length along the bottom of the panel is 5 1/4", and the height from top to bottom is 4 5/8". The width of the panel legs are about 1/4". After cutting out a bunch of these from chipboard, I painted them with red, black, and pale grey acrylic paint. Then the fun began! Several Alice images, selected from this massive compilation, were cut out and glued on the panels, creating entertaining scenes.


Here you can see, just barely, three panels that make up the "I'm Late" scene: the dotted background panel, the suspended clocks panel, and the I'm Late panel. The clocks came from the Clock Faces collage sheet and were suspended from the center chipboard panel with invisible thread. I glued two clock faces together, sandwiching the thread in between. The "I'm Late" banner hangs from black satin ribbon on the front panel.


I love this image of a squashed Alice. I've had an old 1978 Castle Books publication of Alice in Wonderland for an eternity and this illustration fit exactly right in the theatre. The window came from the More Old Windows and Doors collage sheet.


Can't have Alice without a tea party! This particular collage sheet (I used a resized digital download) is a favourite because you can play with the characters. The Hatter, dormouse, and rabbit are removable which doubles the fun.


"Off With Her Head" includes three separate panels and uses adhesive pop dots to achieve the 3D effect of the playing cards.

Here's some pics of the individual panels I created for House of Alice. The background panels are double-sided, so I ended up making 12 pieces.




The End.


 The list of supplies can be found HERE. Happy New Year!

Saturday, December 26, 2015

Itty Bitty Tiny Cabinet of Cute

So seriously, how wonderful is this micro china cabinet from Alpha Stamps?! It's the cutest thing ever after a Samoyed puppy. The cabinet has a functioning door, is "glass" fronted, and look at those curvy legs! The kit comes unassembled, but never fear! It's a cinch to put together. Don't let all those minuscule parts deter you from making a beautiful 1:12 scale piece to add to a room box or a fancy Greenleaf house. My china cabinet was together in just eight pictures. Did I mention there is also a plant stand in the kit? Let's put this thing together, shall we?


Materials: (this pic doesn't count as one of the eight, for the record)

China Cabinet and plant stand kit
Stain (included in kit)
Testors non-toxic Liquid Cement with precision tip
Xacto knife
Sandpaper
Paintbrush


That is the kit out of the box. In the center are pieces for the wee plant stand and the stain is in the white packet. See the bit of plastic that is covering the 12 on my cutting mat? Those are actually essential parts to your cabinet, so no throwing those away! We'll take a peek at those later. 

Step One:

Leave all small pieces attached to "trees" while you stain. It was easier for me to remove the larger pieces from their trees before staining, but whatever works for you. Remove pieces with an xacto knife, sand the small spot where it was attached, stain one side and then the other. The stain dries pretty quick so no waiting and waiting and waiting before staining the other side.


Step Two:

Carefully remove the small pieces with the craft knife and then sand that spot smooth. You may have to touch up the color in those areas but it sure beats trying to hang on to those little pieces while attempting to stain them. 

Step Three:

Using your xacto, cut out the panes for the cabinet. I cut just on the outside edge of the black line and found it to be the perfect fit. Run a very thin line of glue along inside edges of the cabinet front pieces and place panels inside.


Step Four:

Glue bottom of cabinet to back piece.


Step Five:

Glue sides of cabinet to back and bottom. Ooo, legs!


Step Six:

Apply a thin line of cement to ledge on cabinet back. Insert bottom shelf at an angle from the open top, and then pull the front edge the shelf toward you to set in place. That may sound confusing until you actually do it. Repeat for next shelf. Place dots of glue where the shelves meet the front panels (there are designated spots for this) and hold shelf in place for a few minutes.


Step Seven:

Nearly there! Run a line of cement along edge of back piece and along the tops of the side pieces. Insert the small peg on the bottom of the door into the hole on the cabinet's bottom piece. Place the final piece on the top of cabinet, aligning the top door peg with the coordinating hole. Hold, hold, hold...


And finally, Step Eight:

Remember that impossibly small bit that could've passed as scrap? The thing that was so puny I had to push my eyeglasses up onto my forehead so I could see it bit? This piece right here? Yeah, you need to paint that gold. Or whatever you fancy.


After the key is dry, trim it away from plastic....don't drop it, don't drop it, whew!...and using tweezers, adhere it to the front of cabinet. All done!


This is the plant stand that is included in the kit, along with a really nice rocking chair (also a kit, and just as simple to put together).


Quarter for Scale


Here is a link to the china cabinet and plant stand kit, plus the miniatures used to decorate it. Don't forget to get enough stuff to fill up those shelves!


Saturday, November 28, 2015

Spirited Sleigh Ride & Retro Santa Wall Art

It's beginning to look a lot like Christmas! Of course that means (if you are a crafter) you have begun to panic about: 1. all the holiday projects you wanted to make and should've started in June, and 2. all of the projects people have asked you to make and, well, erm...how many days until Christmas? And where has that fifth DPN gone?!

Never fear! Thanks to the new Large Chipboard Sleigh from Alpha Stamps, I found a way to whip up a quick handmade gift that most grown-up people will actually enjoy. (Unlike the knitted sweater with one sleeve slightly longer than the other.) 

The Spirited Sleigh is a festive little present made with a little bit of retro scrapbook paper, some awesome pine twine garland, strips of pretty gold ribbon and trim, a few red glittered star picks, a couple of pinecones, and six mini bottles of liquor to get them into the holiday spirit. 


The beautiful chipboard sleigh couldn't be easier to assemble, even if you've already been hitting the eggnog. The kit has a handy sleigh shaped template, so you just trace, scissor, and glue! I used the template to cut an inside and outside shape to cover the sides, then used the front, bottom, and back chipboard pieces as templates to paper those sections. The sleigh's runners were painted with red acrylic, then stamped and embossed with embossing powder in Gold Tinsel. The sides of the sleigh were adorned with the green pine twine garland, petite pinecones, a few glittery holly berries, and vintage jingle bells.


I'm going to share some pointers to save you some time, one thing we all need more of this time of year. Make sure you have enough paper to cover your sleigh, especially if you need to line up patterns or want specific patterns in a certain spot. That's a no-brainer, of course. Paint first, paper second, assemble third, decorate last. I painted the runners and edges of the front and back pieces, then embossed the gold scroll design. Like I mentioned earlier, the included template was used to make four sleigh-shaped paper pieces; two for the inside and two for the outside. The chipboard front, back, and bottom were traced around onto my paper, I cut those pieces out, inked the edges, then all of the papers were glued to their coordinating chipboard piece. Sounds like a lot but it really took me longer to decide which paper I liked best. That, and googling a recipe for a cocktail using the seventh mini bottle that "absolutely would not fit aesthetically in the sleigh". Anyway! The right side of the sleigh was placed with the inside up (meaning I had the polka dot side facing up) and I glued the back, bottom, and front pieces in place. The other side piece was glued on, and once dry, the embossed runners were adhered. Yay, a sleigh! 


The rest was a snap- the wired pine garland was draped along the sides and decorated with Stickle coated pinecones, holly berries, and a jingle bell. The garland was also used to make the simple wreath on the front, which got a sprinkling of Vintage Christmas Flower Soft and a festive bow. And finally we get to the booze. I purchased seven, no...six! random mini bottles, just for variety. The tops were covered with a circle of Christmas-y plaid fabric and I hot glued a gold looped ribbon and a red glittered star pick (minus the pick) around the neck. Threw in the leaves and some pretty glittery holly berries, and all done. Even before you get through that first cocktail. Cheers!

Go right HERE to see what I've used for the Spirited Sleigh.

Since that project went so fast I figured I should take advantage of the giant mess I had made and make another something. It started with a smiling Santa on the Santa Baby collage sheet. Look at that face!


I used most of the images from that collage sheet along with some book pages I had cut from duplicate copies of Little Golden Books Santa's Toy Shop and Rudolph the Red Nosed Reindeer. 


The ATC sized tray has been in the stash for eons, but it would be fun to do a mini version using this cute shadowbox and filling it with teensy toys. Like the mini shadowbox, my tray was unpainted wood but after a few coats of white acrylic paint, all was ready for decorating! I wanted Santa's sleigh to be flying across the middle so that part was done first. The pieces were embossed with Gold Tinsel embossing powder and decorated with snippets of pine twine garland and red glittered star picks (again without the pick part. It's a shame I kept pulling them apart because they are really lovely!) Santa was added to the sleigh and the pieces were placed, without gluing, onto the tray until I decided on what the background images would be. The rest was pretty random.


Most everything I used for the Retro Santa Wall Hanging can be found HERE. 

From the stash: ATC wooden tray, vintage jingle bells, dollhouse fence, button, old Christmas bulbs, adhesive pop dots,  fabric poinsettias, and a striped paper straw. That's it!

I think I might be a Scrooge and keep this one for myself. Happy Holidays!