Wednesday, July 31, 2019

The Doll Maker's Room

Sometimes the smallest of things spark the greatest happiness. Whether it comes in the smile of a newborn baby, a kitty jumping in your lap for a snuggle, or an espresso macaron, finding joy in your everyday life is essential. Lots of times it is just there waiting for you to see it.

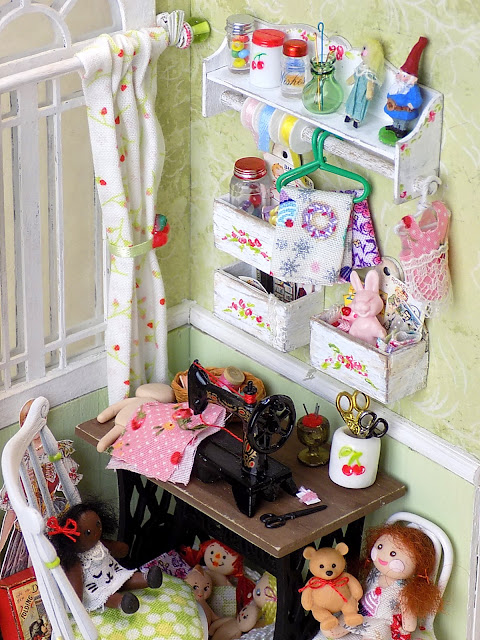
Joy presented itself to me via Alpha Stamps in the form of a 1:12 scale Vintage Sewing Table, which is nearly as nice as a warm kitty in your lap. The Vintage Sewing Table led to (surprise!) a Vintage Sewing Machine, then a 4 x 4 inch square room box to put the table, followed by a shelf...well, when it was all said and done, I had the makings of a little sewing room and I couldn't have been happier.


 I tweaked the idea of a sewing room into a little doll maker's space early on, mostly after assembling the Tiny Spice Rack into a ribbon holder. Don't ask how that translated into "doll maker's studio" because I couldn't tell you. It just sort of happened.


The color scheme came from the Fruit Paradise 6 x 6 paper pad and a couple of really sweet Tiny Resin Cherries Cabochons (used as curtain tie backs). I assembled and painted a Black Chair Kit and sewed a teensy cushion for the seat and painted a Miniature Red Metal Chair while I was at it. There's a Tiny Picnic Basket on the floor that holds a rag doll and some paper dolls as well as a crocheted basket full of dolls in progress under the sewing table. 


On top of the sewing table are ALL OF THE SCISSORS, minus the Small Brass Scissors Charm that has so discretely slid down inside one of the Letter Bins on the wall. I painted a pair of cherries onto a  jar from the Miniature Porcelain Kitchen Jars Set to match the curtain tie backs. Nestled on the back corner of the sewing table is a basket full of thread spools, yarn, and more scissors.


The 1:12 Wall-Mount Mail Holders Set (swoon!) were turned into bitty bins for fabric, patterns, button cards, and even a silly rabbit. I really love those things! After assembling them, I slathered modeling paste over the surface with my finger, left them to dry, then painted the holders with white acrylic paint. They were sanded a bit, given a blotchy floral paint job, and finally aged with a smidgeon of watered down brown acrylic paint. They are pretty cute in a very rustic sort of way. It works here, I guess. I mimicked the paint job on the spice rack for cohesion. 


And here is what started it all: that beautiful Vintage Sewing Table! The top was painted brown and then "roughed up" with some sand paper and the base was painted black. So simple and yet so wonderful. Thank you tiny sewing table for sparking joy in my life!

Hope you find happiness in the tiny things in life too!

For a list of supplies used, GO RIGHT HERE.


Wednesday, July 17, 2019

Marie Under the Sea Tin

What's this? Something that is NOT Halloween themed? How did that happen?! I don't know exactly, but I was feeling like making something kooky, which lead to gluing a fish tail on Marie and giving her a jellyfish parasol.


Weird? Yes. But it did the job of satisfying that want, and it was finished in two hours. That is the beauty of altered tins. They are small, fun, and quick to complete.

After deciding to put Marie "under the sea", the first thing I did was mix some resin and pour a tiny bit into a small plastic cup. I flicked Alcohol Pearls on the surface and added glitter. When the resin hardened, it was popped out of the cup and trimmed in half. I glued some teal fibers and a flower stamen to the cut side and created (what I thought) looked like a jellyfish umbrella. Twin 1 said it was ridiculous and made no sense whatsoever, so I felt I had achieved my goal.


The bottom of the tin is filled with seed beads, seashells, and glittery bits. The base of the tin is a wooden spool glued to a peg doll stand. Bam, done!


And now for something completely different! (Spoiler alert. It is probably Halloween-y.)

A list of supplies used can be found RIGHT HERE

Tuesday, July 2, 2019

Halloween Mini Folio

Making another Hallowe'en project was not in the plans when I received the June Kit from Alpha Stamps, I swear. How could spiders and pumpkins and witches come to mind when presented with the beautiful Butterfly Garden paper in the kit, not to mention those metal bees? Well, firstly, the Nightfall paper was still laying about on the craft table, taunting me. That paper is amazing. And B, I sat with the ends of the Wide Accordion Book in my hands, folding and unfolding it until something came to mind. That action led to the idea of hand cutting silhouettes in the Wide Accordion Book and then sticking them into the Tall Accordion Book Letter Folder. Somehow.


I wanted to have a magnet closure a little further down from the flap, so I painted a bit of heavy cardstock, glued a piece of teardrop shaped paper to it, then cut around the teardrop. The magnet is glued to the underside. Initially, it wasn't supposed to be an owl's beak but I had discovered the Wooden Christmas Advent Calendar Round Tags whilst digging in the chipboard and...hey! They could be eyeballs! Happy accident. I just sanded off the top bits of the ornaments. I added a BOO banner that sorta looks like feathers. 


Inside the folder is the accordion folded silhouettes at the top and a basic spinner card on the bottom. The entire project was kept simple and flat so it could be mailed easily.


The spinner card has a dial to change the message from eeek!, hiss!, scary, spooky, and mwor! The banner is raised so it can slide over the top of the card holder, which helps it stay in place. To make the holder, I cut out a collage sheet image and glued it to black cardstock then trimmed around the image. It is attached to the folder with thin double-sided tape along the bottom of the image, so the card can slide behind it.


 The silhouettes can be removed from the belly band and unfolded to reveal all manner of creepy! Yay! They are backed with Hallowe'en orange vellum so a tea light can be placed behind the silhouettes.


Neat! Here's how I made the accordion silhouettes (so easy):

1. Make a 1/4" border on each section of the accordion book. Draw simple images inside the border with a white pencil. Make sure parts of the image touch the border. It is exactly like pumpkin carving, which makes it especially fun. Cut out the negative space.


2. Cut out rectangles of orange vellum that are slightly smaller than each section of the accordion. Affix the vellum using double-sided tape. 


3. Optional: cut frames to cover the edges of the vellum. It looks nicer that way. Ta-da, you're done!


Happy Hallowe'en crafting (it is never too early)!

For a complete supply list, GO HERE.