Saturday, October 2, 2021

Practical Magic Shop

 October is here! Time to decorate the house and craft my little fingers off! I managed to sew a bunch of tiny chenille pumpkins to send to Japan before completing a witchy miniature shop for Alpha Stamps (and I also finished a box of Count Chocula. Don't judge.)

After seeing the Nightfall Lantern Kit, I waffled over what I wanted to do with it. The Nightfall Paper is beautifully rich and is both Halloween-y and not Halloween-y, which makes it quite a treat! Eventually, I decided to pick up a Simple Scene Box for my new project to create something witchy:


The Simple Scene Box is a cute 7" L x 4.5" W x 8" Tall kit with short sides around the front and space in the back to hide wiring should you choose to electrify your scene. It seemed silly not to have a light. Good thing there's Tiny Halloween Lanterns! More later. 


The Practical Magic Shoppe is a quaint little place with spell books, potions, and brooms, plus a few odds and ends to spruce up the cottage. Who could resist a winking cat??


I didn't go overboard with all.the.things, leaving the project somewhat tidy and uncluttered, mostly because the Nightfall paper is too lovely to cover up. There is a Miniature Vintage Cash Register (left unpainted!), an etched Ouija Board 3 Inch CoffinPumpkin Lollipops, and a "take an eyeball leave an eyeball" dish at the end of the counter.


See the black cauldron in the back? It used to be silver, but it was painted black some time ago and I find myself pulling it out of older projects to use again and again. That thing is great! Even though you can't tell, it is filled with Black Landscaping Coal. Oh, I should've put the Metal Grain or Feed Scoop in there! Guess it isn't too late for that.


Two of my new favorite things are the Tiny Dragon Sconce and the Tiny Halloween Lanterns - Set of 3. The Tiny Dragon Sconce actually has an ornate back piece, but mine got chopped a tad to fit on the side of the Simple Scene Box. The lantern has orange vellum and a light inside (pics below).


The 4.5 Inch Tall Wrought Iron Fence exactly fit on the back of the scene box minus the two teensy bits that are on the bottom of the fence. Those were snipped off and it fit like a dream. The only other alteration I made was the rectangle of thin balsa glued to the Shop Counter.

There is a Narrow Spider Web Flourish Border tucked behind the items on the shelf. It's conveniently the same length as the shorter of the 1:12 Shelves - Set of 2. It would be cute glued to the front edge of the shelf, too.


The assembly of the things in the project are easy, and I'm going to share a few tidbits with you. First is the construction of the Simple Scene Box.

There's 8 pieces: 


Before gluing things to things, I measured the Base and the Back (inside the tabs!!) and cut paper to fit. I wanted to use the small print roses in the Nightfall 6x6 Paper Pad for the floor and had to piece it together. Do not glue it to the base just yet!


Next, glue the Front, Bottom Left, and Bottom Right pieces to the Base. Glue strips of paper on each of the sides and front. In the photo below, you can see there is a small section on the Bottom Right that is not papered. I chose to leave that area uncovered on both the Bottom Right and Bottom Left because the Side pieces go over this section. It isn't that big of an issue and the whole thing will work out fine if it's papered over, but that's what I did. 

Next, glue the Back in place, like below. Glue paper to the Side and Top pieces before gluing to the Back. Finally, glue in the two pieces of paper for the Back and Base. Now you can decorate!


Here's the rectangle of balsa that makes up the counter. It was cut just a hair larger than the top of the Shop Counter. 


And here's the working Tiny Lantern!


There's a strip of orange cellophane glued inside the lantern, and an itty bitty LED stuffed inside.


The back of the Simple Scene Box:


which is covered with a piece of foam board, like so:


Well, that brings me to the end of my Practical Magic Mini Scene! Time to move on to something a little different and maybe get a new pair of knitted stripy socks finished, too. Happy October!

FLY OVER HERE to see the supplies used! 

Saturday, September 18, 2021

Little Coffin Hutch

Eeek, Halloween crafting is in full swing! My entire craft area is covered in bats, skulls, spooky paper, black cats, glitter...I think all of the Halloween stuff I own is scattered across two tables (save for a teensy workspace where the cat sometimes sits). 

I finished a mini project recently using Alpha Stamps new Little Niche Shrine - Coffin. Leslie knows how much I love the niche shrines, so she sent one to play around with. (it is also possible I begged for one, whatever!)


I covered the sides of the shrine and added two shelves to make a miniature hutch to use in a future project.  There's a faux drawer and spindly feet, too. A brief run-down for adding sides and shelves is down below.


The hutch is filled with a handful of retro orange and black goodies like a 1:12 Brass Picture Frame painted purply-black with a sweet witch image, re-covered Thinner Mini Books, a fun black cat bunting from the Witchy Mirror Trims Collage Sheet, and a Tiny Ceramic Vampire Bead.


There are a few Mason Jars filled with glitter and microbeads, a candelabra, jack-o-lantern, a tombstone...


a kitty, an Amber Resin Contoured Bottle with another retro image, white canister used as a flower pot, and a cute Trick-or-Treat poster all crammed in that 1 3/4" x 3" space!


It doesn't take much to transform your Little Niche Shrine into a piece of furniture - a few shelves, some feet, and giving it sides is all you need to do. 

First, paint your shrine pieces black. 

Cover the front and back pieces with paper. I chose to cut out a small rectangle in the center of the shrine front and wrap the extra paper around to finish the edges.


Cut small segments of basswood or balsa and glue them along the top, bottom, and side edges of the back piece. Glue the niche in place on the front piece.


Apply glue to the edges of the shrine and wrap a strip of paper around the shrine. This works best if you have 12 x 12 paper because one strip will wrap around the shrine. I used two strips from a sheet of 6 x 6 and made the strips meet on a corner.


The shelves are nothing more than strips of cardboard that is wrapped in paper and glued in place:

Cut two pieces of cardboard 1 3/4" x 1/2" (pssst, it's the free stuff that is shipped with collage sheets from Alpha Stamps).


Paint the edges black and glue one strip to your paper. 


Apply glue to the other side, then fold the strip upward. Cut off the excess paper. Poof! One shelf covered!


Repeat for the other shelf and glue 'em where you want 'em. Done!


So now that my coffin hutch is finished, I'm going to dig through the scattered stash for the things needed for the next Halloween project while enjoying a bowl of Count Chocula. It is Halloween, you know. 

GO RIGHT HERE to see the supplies used in the Coffin Hutch.

Happy spooky crafting!

Saturday, August 28, 2021

Witch's Potion Niche Shrine

 Anyone else ready for summer to be over? Two months ago? I'm eagerly anticipating the slightly "cooler" weather, the departure of mosquitoes, and...Hallowe'en!!! The heat and annoying bloodsuckers will be lingering long after October, but at least I have something to look forward to that isn't too far off. And being holed up in the house gives me time to make all the spooky things (or at least three). 

My latest Hallowe'en project was another small one, but I really love Alpha Stamps niche shrines. Like, really, really. I've made quite a few things from them already, however,  I recently realized each one could be Hallowe'en themed and together would be a nice mantle display. Even the egg. Is it a giant spider egg sack, alien egg, or a pumpkin (just add stem)? Pretty versatile things, those niche shrines.

I used the Little Niche Shrine - Potion Bottle for my recent creation:


The Potion Bottle was painted black before being covered with Eerie Night Cemetery Secrets Scrapbook Paper and Brimstone Bulletin Scrapbook Paper. I sanded the paper here and there for that aged look. There's a Tiny Dot Dresden Borders - Black trim around the niche opening. 


The center was wallpapered with Witches & Wizards 6x6 Paper Pad before a bunch of stuff was tucked inside. There's a tiny shelf to hold a few tiny things like a teensy witch hat! I chopped a bit off the Rustic Broom to make it fit and painted eyes on the cat


There is a skull in there, a few rolled up spells, bottles of potion ingredients, and a crystal ball. The potion smoke is green wool roving left over from my needle felting days. (It was short-lived. I only have time for one craft with pointy sticks and I'd much rather knit socks.)


The neck of the bottle was wrapped with wool and I added a Bronze Spider Charm. The back was covered with snippets from the Witches & Wizards 6x6 Paper Pad, the hanger glued on, and then it was finished! 


Stay magical, folks! And thanks to Leslie for waving her wand over my awful photos and making them pretty. :)

GO HERE to see the supply list for the Witch's Potion Niche Shrine!

Wednesday, August 11, 2021

Mini Peculiar Plants

 Yesterday, right in the middle of doing eleventy thousand things, I had this brilliant idea to drop everything, ignore people, sit down, and make something. You know, as one does when one's To Do is two pages long.

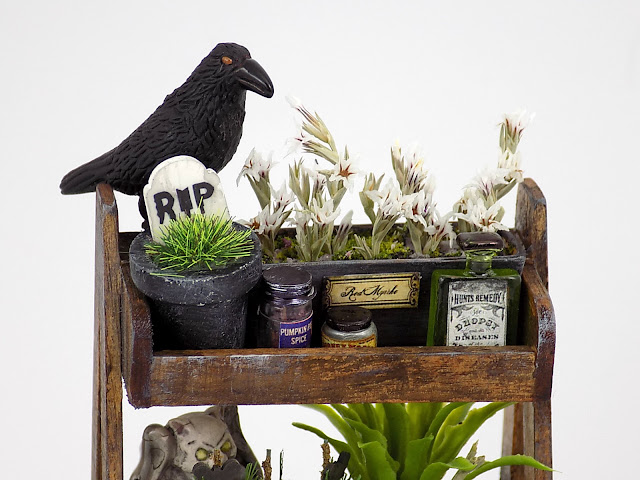
It started with this fabulous Wood Plant Stand with Drawer from Alpha Stamps. This thing's been untouched for a little while now, mostly because I had so many different plans for it. Would it be a display shelf for a bakery, loaded with bread? Storage shelves for mini art supplies? A kitchen shelf for cookbooks and pots and pans? It eventually turned into what it's meant to be: a plant stand. With a bit of spooky sprinkled here and there. :D


The first thing I did was give the plant stand a nice wash of diluted black acrylic paint, then a dry brushing of some metallic silver, eggshell, and dark brown paints in various spots. The same thing was done to all of the pots, baskets, and chipboard pieces. I used alcohol ink to cover the miniature planter with foliage (on the bottom shelf behind the skull plant). It's such a cute plant as is, but I ended up plucking the pink flowers it came with and replaced them with orange fall foliage. 


Once everything was dry, it was just a matter of stuffing the painted planters with lichen, small brown path pebbles, moss, and all of the plants! They were arranged on the shelves along with a few bottles and Halloweenie beads. 


I really love the opening drawer on this piece. Room for more stuff! 


The bamboo house plant on the side was altered only a smidge: the basket was painted, path pebbles added, and polymer clay eyeball plants were stuck in. You can make the eyeball plants in about 5 minutes.

Grab some polymer clay, Eyeball Polymer Clay Halloween Slices, and a length of green florist wire.


Roll a small ball of polymer clay then smash an eyeball in the center. Push wire into the bottom.


Roll two tiny snakes of clay for the eyelids and put in place. Bake for a nanosecond. (Use your best judgment. Mine were baked 2 minutes.) Stick cooled eyeball plants into the basket and done!


I feel better now the wood plant stand is completed, and I'm eager for more Halloween crafting! It's been added to the To Do list (but not necessarily at the end). 

HERE is where you go to see all the fab things used for this project. Go make stuff!